 FieldCamp
Calendar Views | FieldCamp
FieldCamp calendar views explained — Calendar, Timeline, Resource, and Map — plus color modes, Job Tray tabs, and the Unscheduled lane for field service dispatch.
Under the hood — see how Visits work in the FieldCamp data model: the fields they hold, how they connect to your other records, and how to customize them.
FieldCamp gives you four ways to look at your schedule — Calendar, Timeline, Resource, and Map — and a refreshed Job Tray, color toggles, and filters that adapt to each one. Each calendar view is designed for a different moment in your dispatch day, and the new layout makes it easy to switch between them, recolor events on the fly, and pull unscheduled work onto the board in seconds.
This guide explains what each view does, when to use it, how the latest color and filter controls work, and how to read the updated Job Tray and Map overlays. For a broader tour of the scheduling workspace, start with the Calendar Overview.
Start with the Command Centre
Open the Command Centre with Cmd+K (Mac) or Ctrl+K (Windows) to jump straight to the view you need:
- "Show me the timeline for tomorrow" — opens Timeline view focused on tomorrow's schedule
- "What does next week look like?" — pulls up a weekly overview
- "Show me the map for today's jobs" — switches to the Map view
- "Who's available Thursday afternoon?" — the AI checks across all views for open slots
For everything the Command Centre can do, see the Command Centre overview.
View Comparison
| View | Best For | Key Feature |
|---|---|---|
| Calendar | Overview planning (month / week / day) | Familiar grid layout — click to create, drag to reschedule |
| Timeline | Daily dispatch across the whole team | Horizontal Gantt chart with technician swim lanes |
| Resource | Comparing two or three technicians side by side | Vertical columns — one per technician |
| Map | Geographic planning and route awareness | Job pins on Google Maps with technician start locations and optimized routes |
Star your favourite view from the view dropdown. FieldCamp remembers your starred view and opens the calendar there every time you sign in.
Calendar View
What It Is
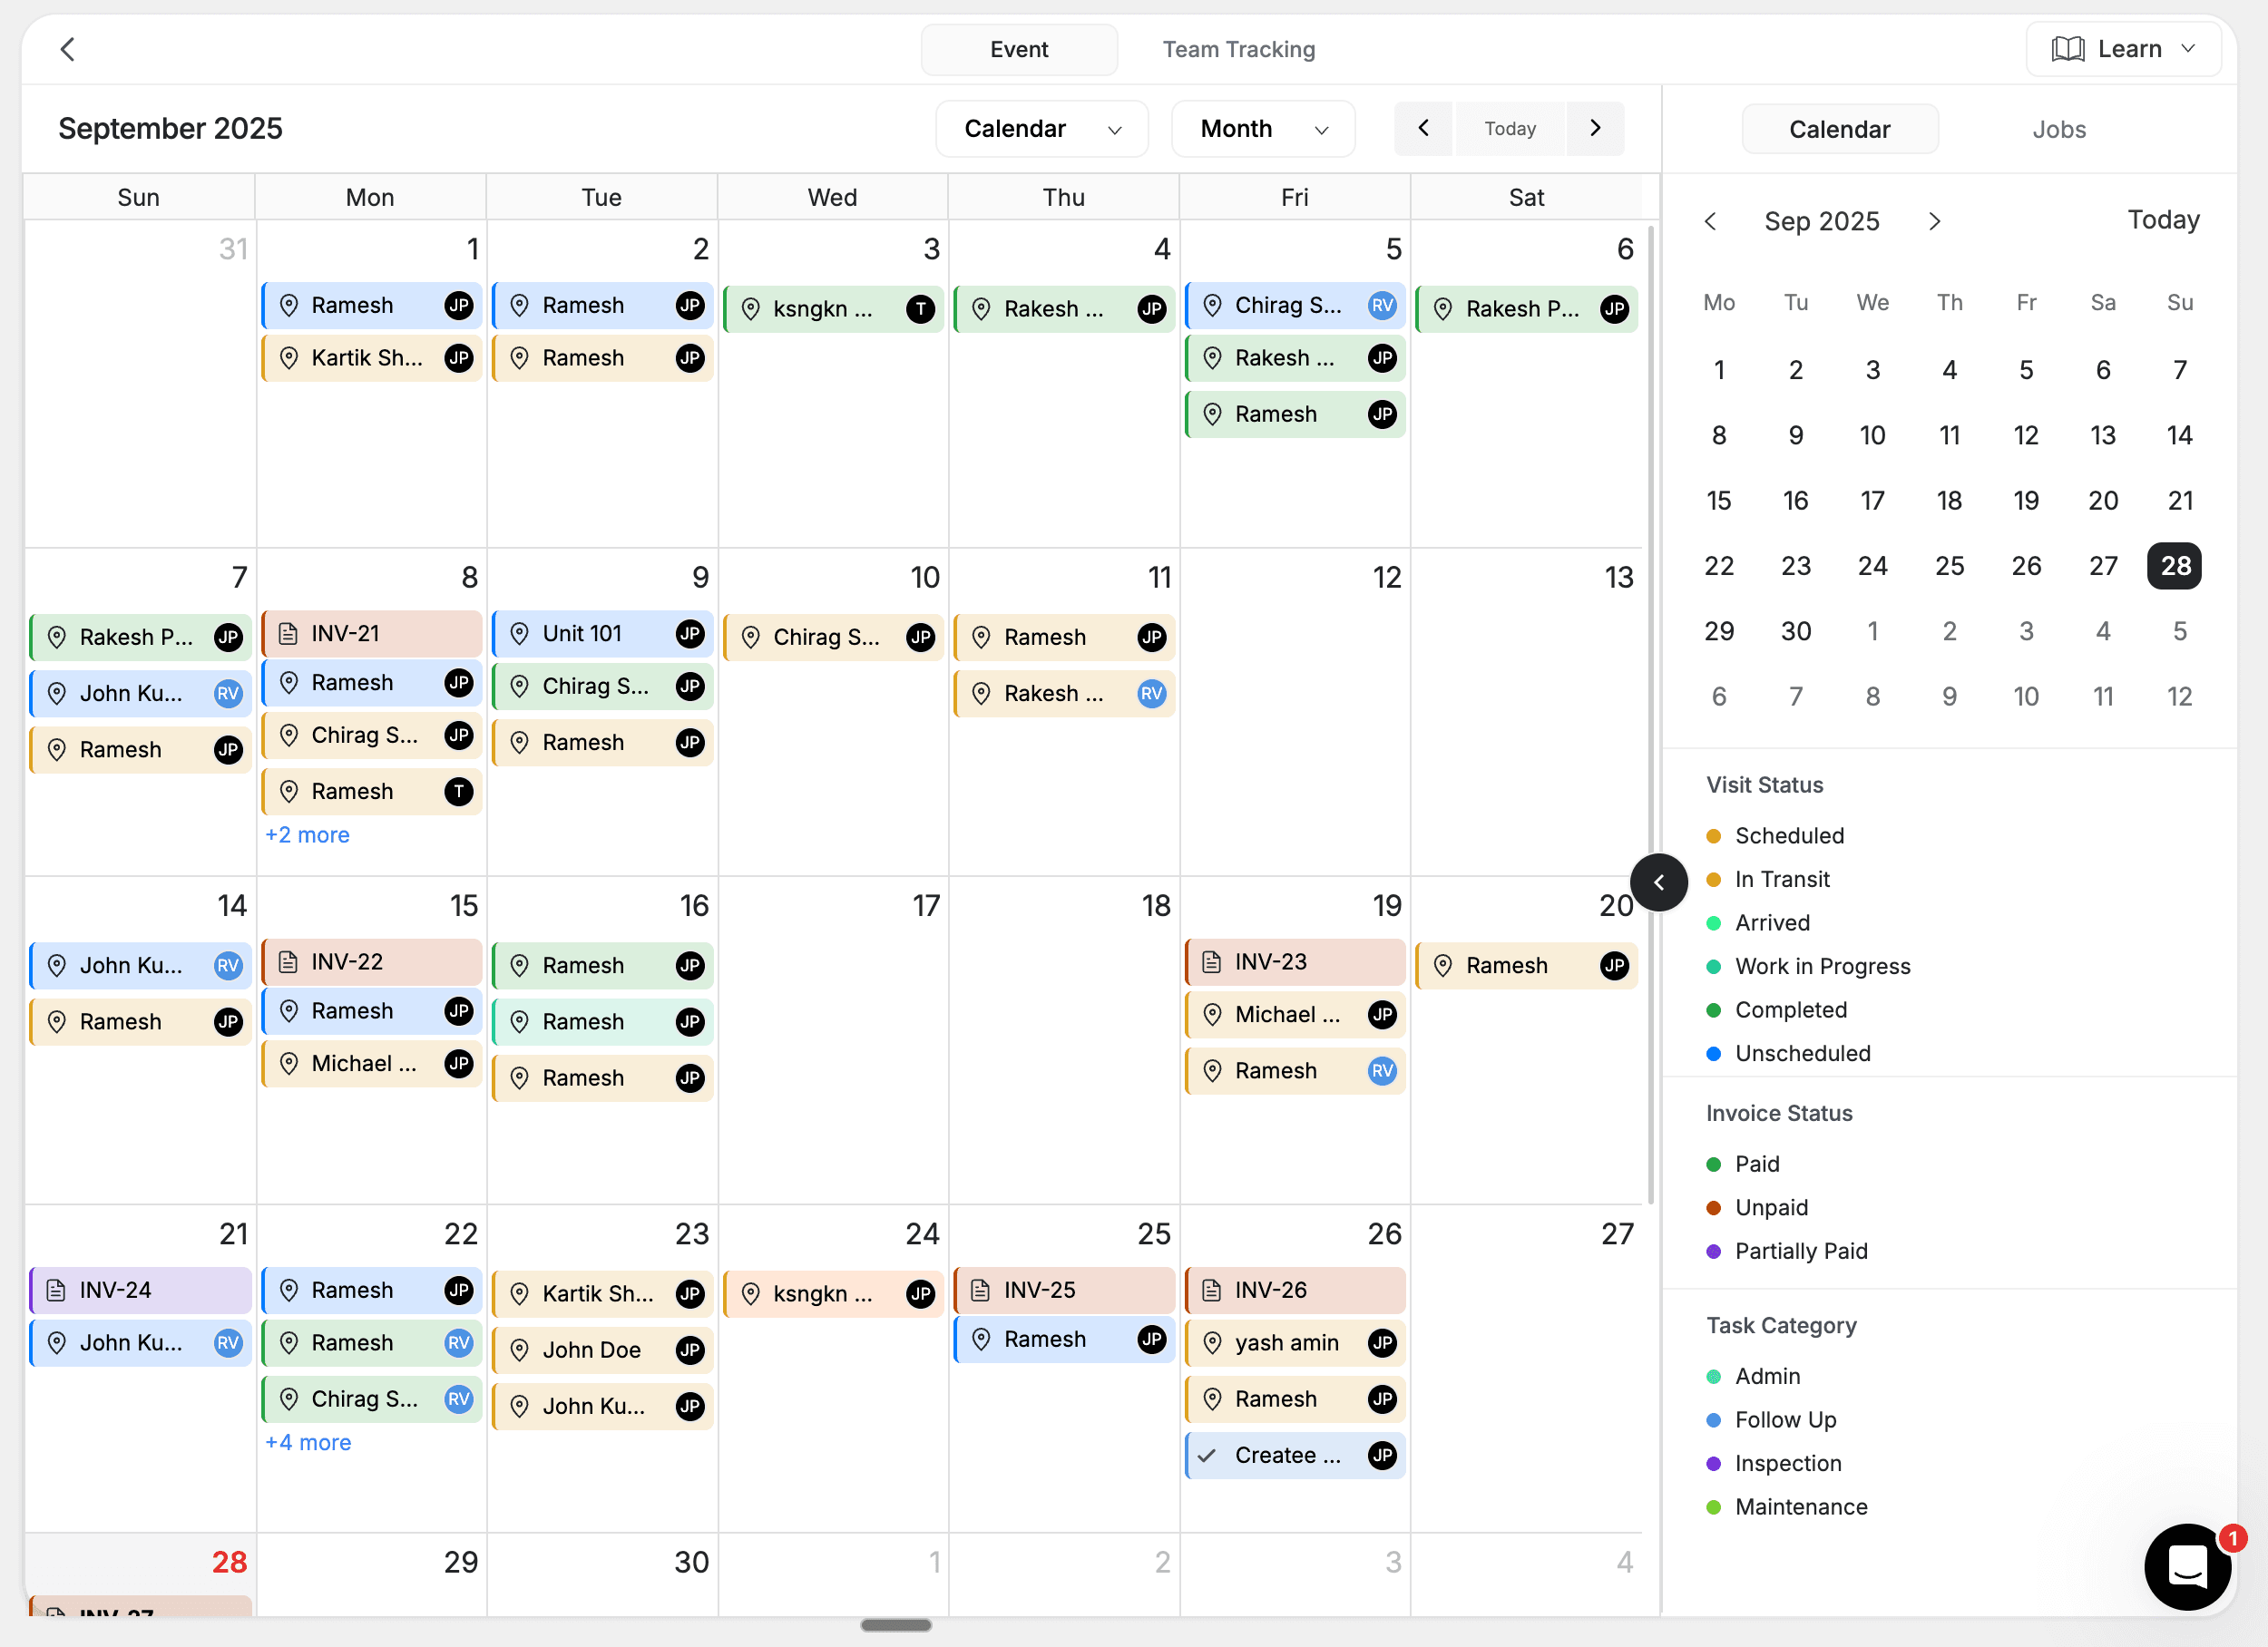
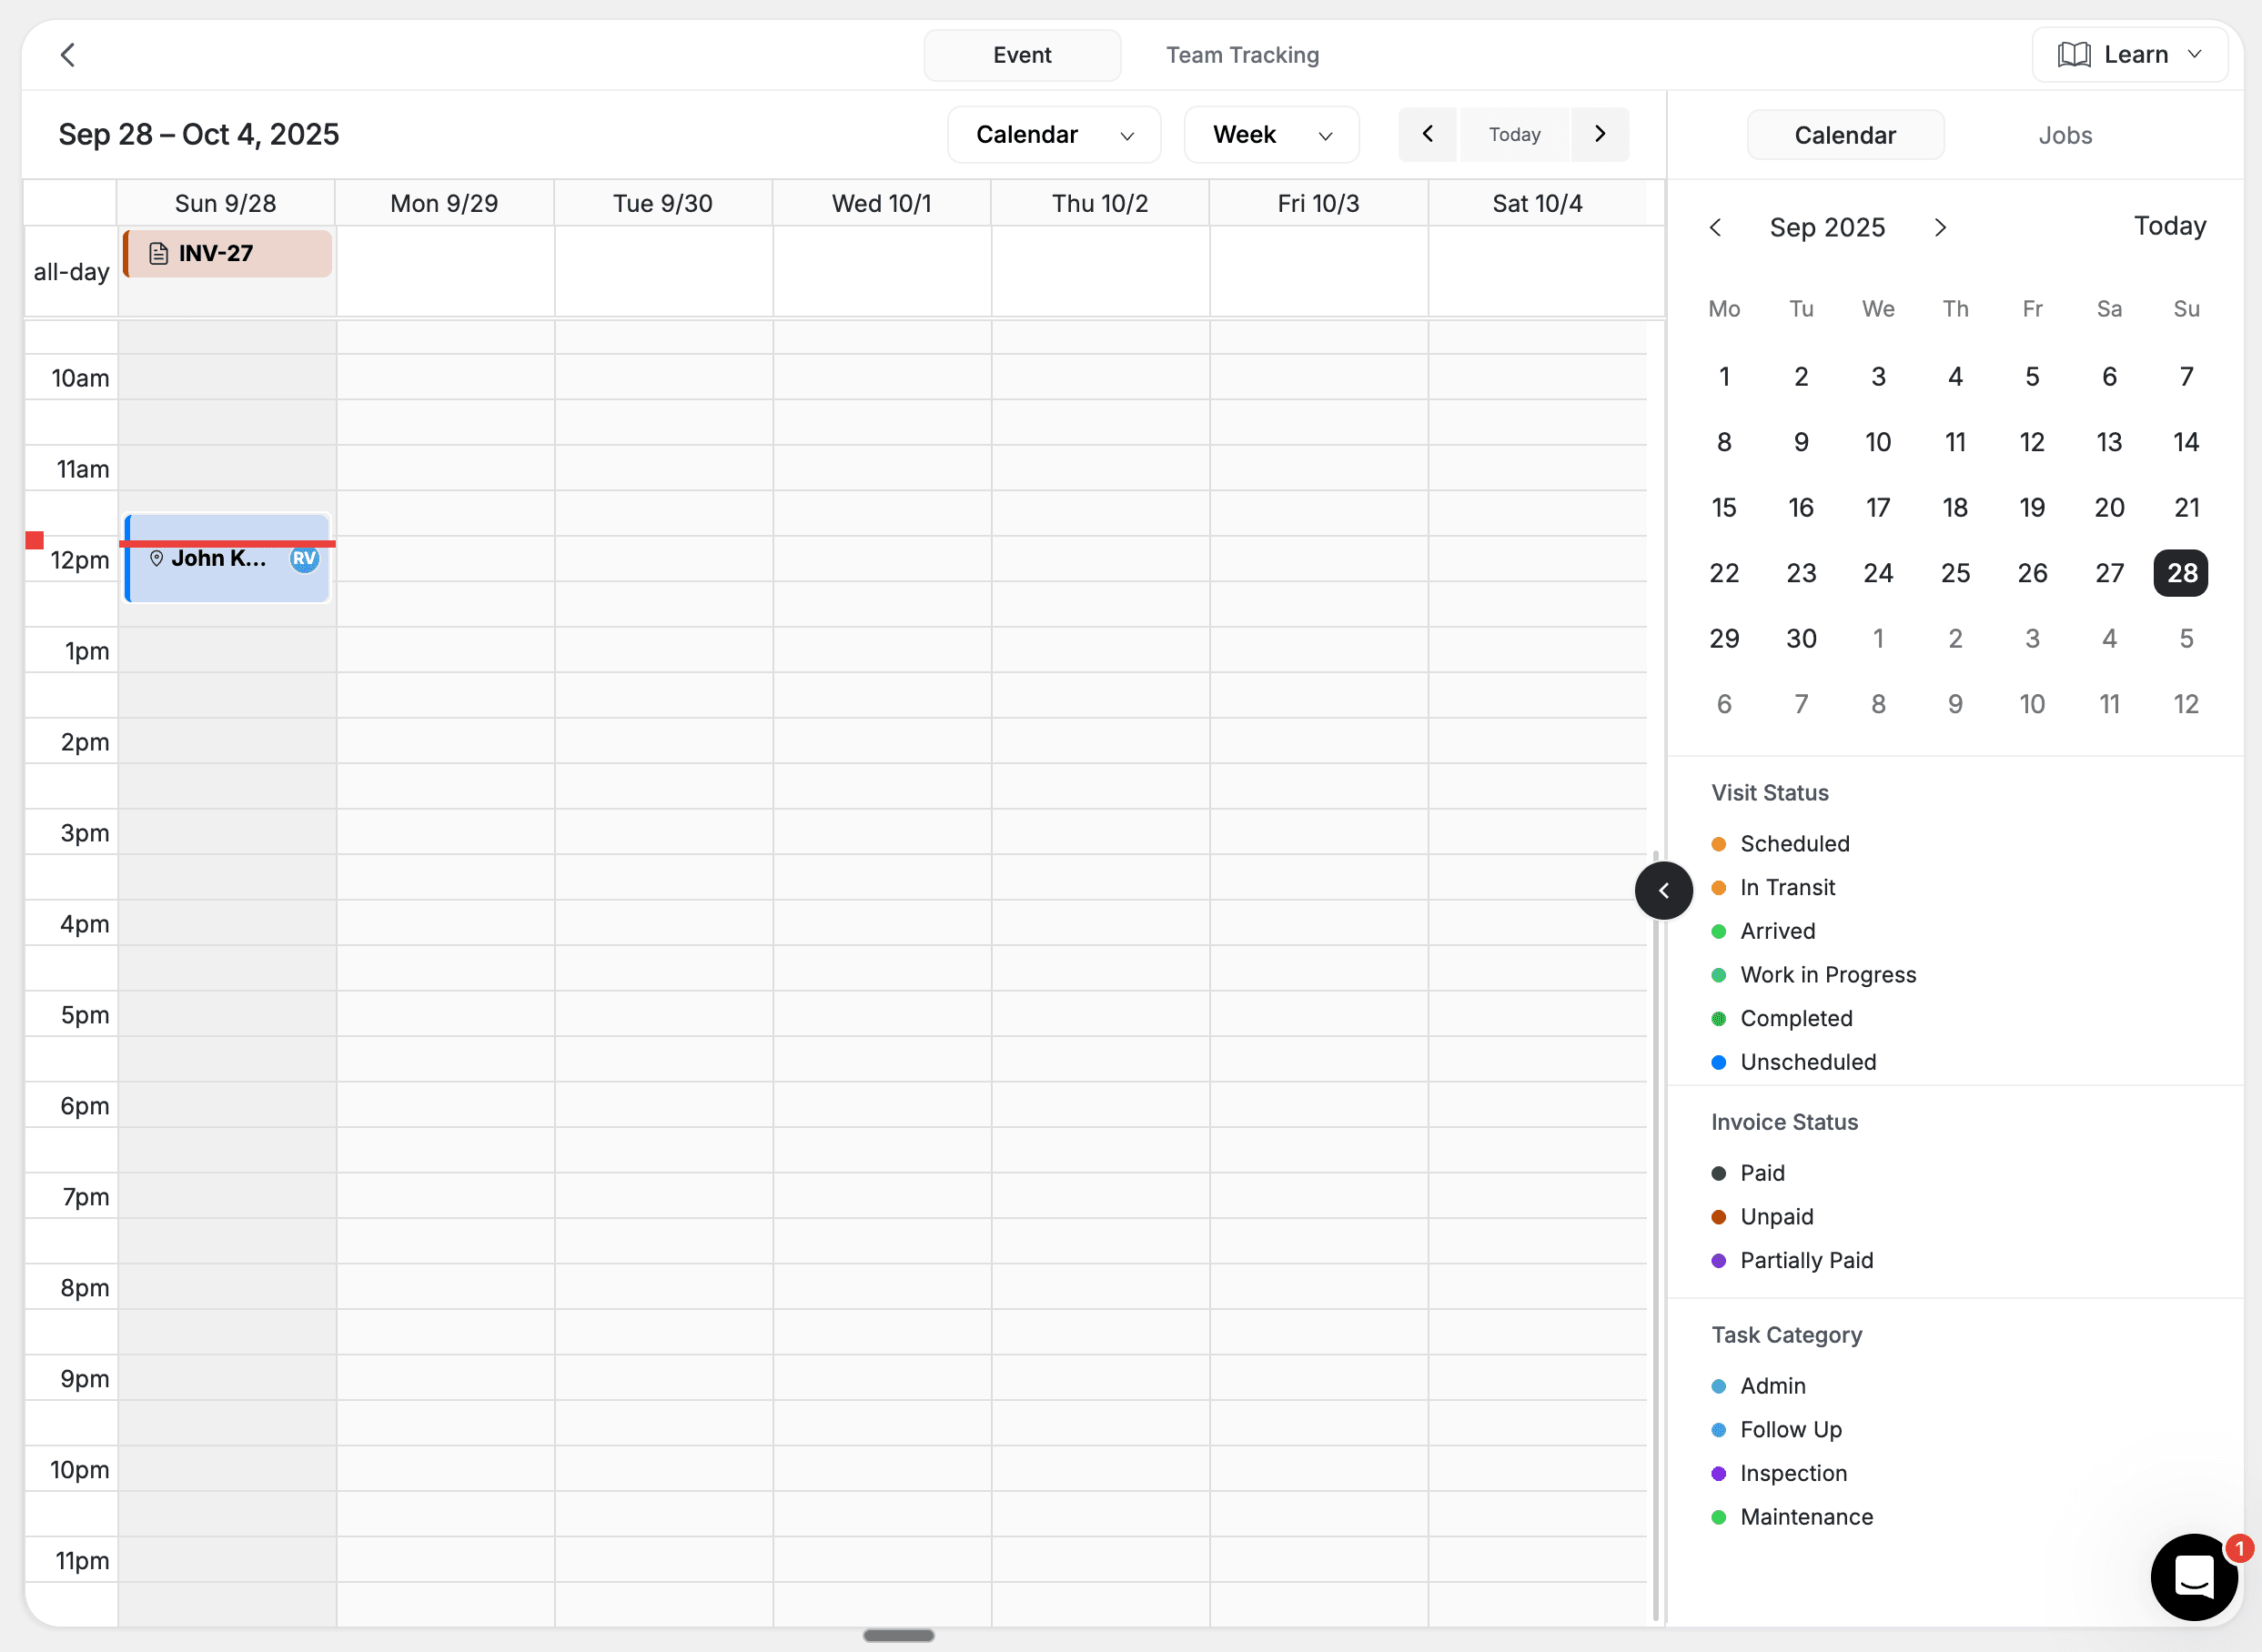
The Calendar view displays your schedule in a standard monthly, weekly, or daily grid — similar to Google Calendar but with drag-and-drop scheduling, color-coded status indicators, and real-time updates. Jobs appear as event cards showing the fields you've enabled — client name, job number, address, status badge, assigned tech, time window, and more.
When to Use It
- Monday morning planning — review the entire week's workload at a glance
- Customer scheduling calls — quickly spot available slots while on the phone
- Capacity analysis — see busy vs slow periods across the month
- Recurring job planning — set up maintenance schedules weeks or months in advance
How It Works
Switching sub-views: Toggle between Day, Week, and Month from the toolbar. Use the arrow buttons to move forward or backward in time, or click Today to jump to the current date.
Creating a visit: Click on any empty time slot. A quick-create form appears where you enter the essential details — client, job type, time, and technician. The visit appears on the calendar immediately. For full job creation options, see Creating a Job.
Rescheduling: Click and hold a visit card, then drag it to a new date or time. Release to confirm. The system checks for conflicts automatically and asks you to confirm reassignments.
Color coding: Events are color-coded by visit status by default. Open Preferences to switch the color mode to Status, Type, or Team — see Color Modes below.
Tips
- Use month view for capacity planning and spotting slow periods
- Use week view for detailed scheduling and workload distribution
- Use day view when you need minute-level precision on a single day
- Apply the toolbar filters to focus on Unscheduled, Unassigned, Idle, or Anytime visits
Timeline View
What It Is
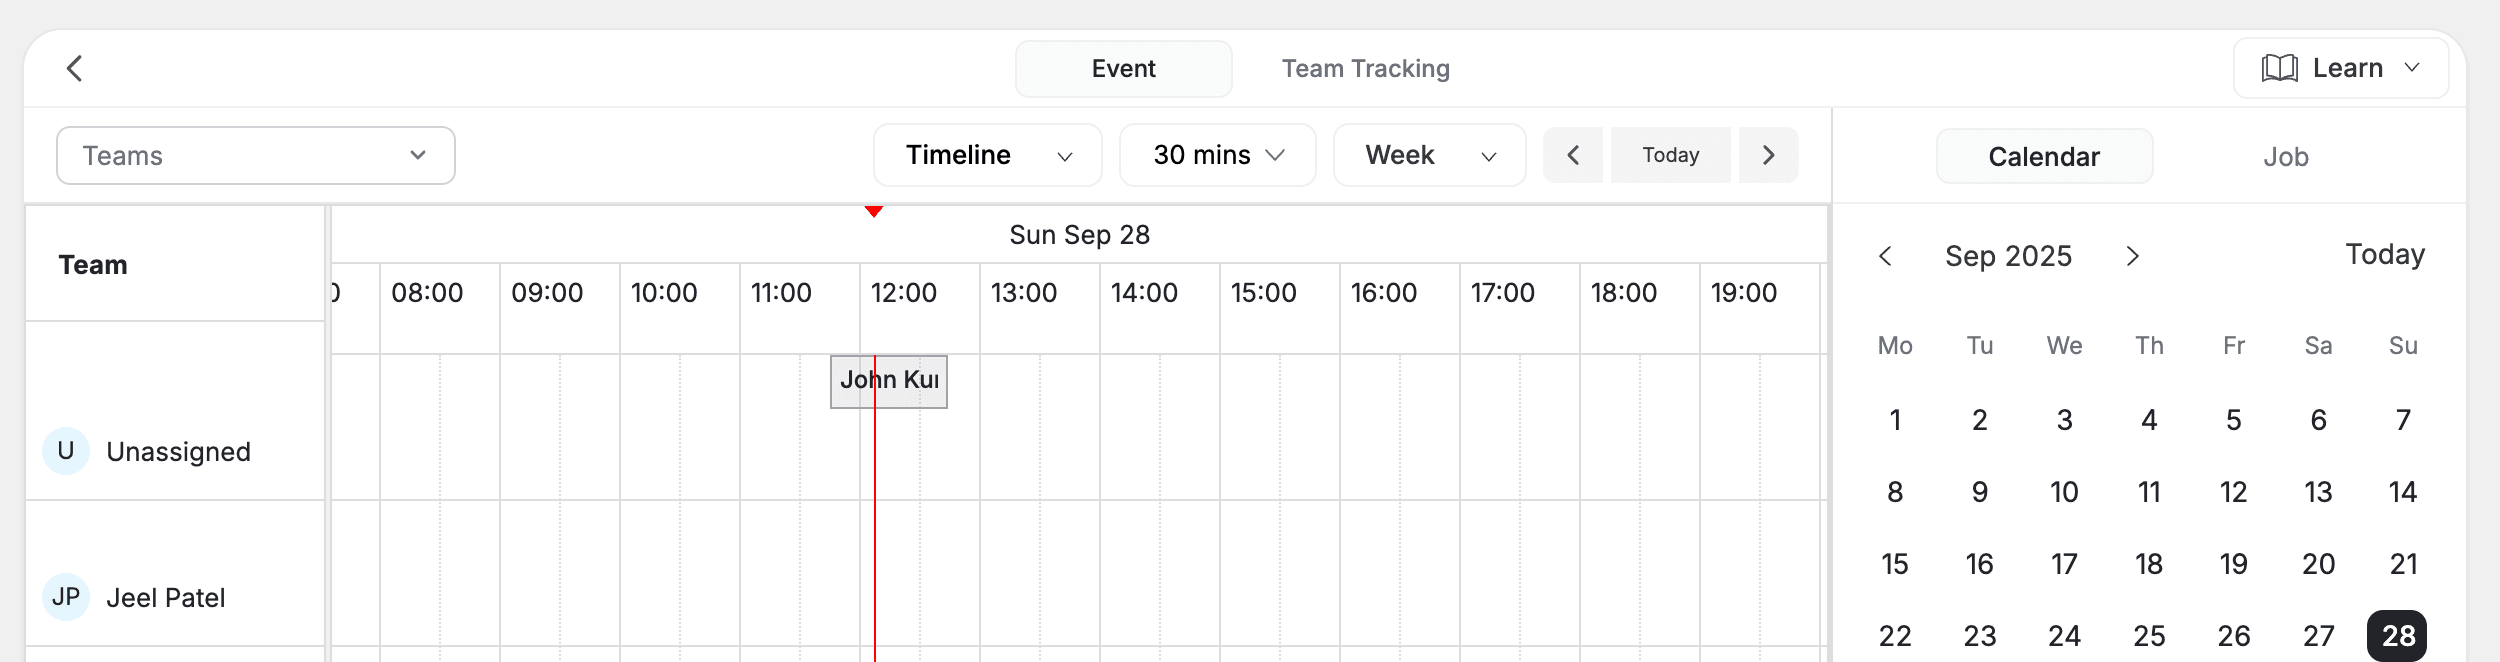
The Timeline view is a horizontal Gantt-chart-style display where time runs left to right and each team member gets their own swim lane (row). This is the primary view for dispatchers — it shows everyone's schedule simultaneously and surfaces an Unassigned row at the top for jobs that have a technician but no time.
When to Use It
- High-volume dispatch days — managing 20+ jobs across multiple technicians
- Emergency insertion — finding the fastest open slot across the whole team
- Load balancing — redistributing work when someone calls in sick
- Real-time adjustments — handling delays, early completions, and add-ons
How It Works
Reading the board: Each row is a technician. Visit blocks sit along their timeline showing the client name, duration, and status color. Gaps between blocks are open time.
Dispatching: Drag visits from the Job Tray at the bottom of the screen onto a technician's row. Drop at the time you want the visit to start. The system runs dispatch validation and warns you before you commit.
Reassigning: Drag a visit block from one technician's row to another to reassign it. The original slot opens up and the new technician is notified.
Zooming: Adjust the time scale for different levels of detail — choose business hours only or a full 24-hour view depending on how much of the day you need to see.
Tips
- Keep the Job Tray open for quick access to unassigned work and incoming requests
- Filter the Job Tray by tab (Unassigned, In Progress, Alerts, etc.) to declutter the queue
- This is the best view for morning dispatch — see your whole team at once
Resource View
What It Is
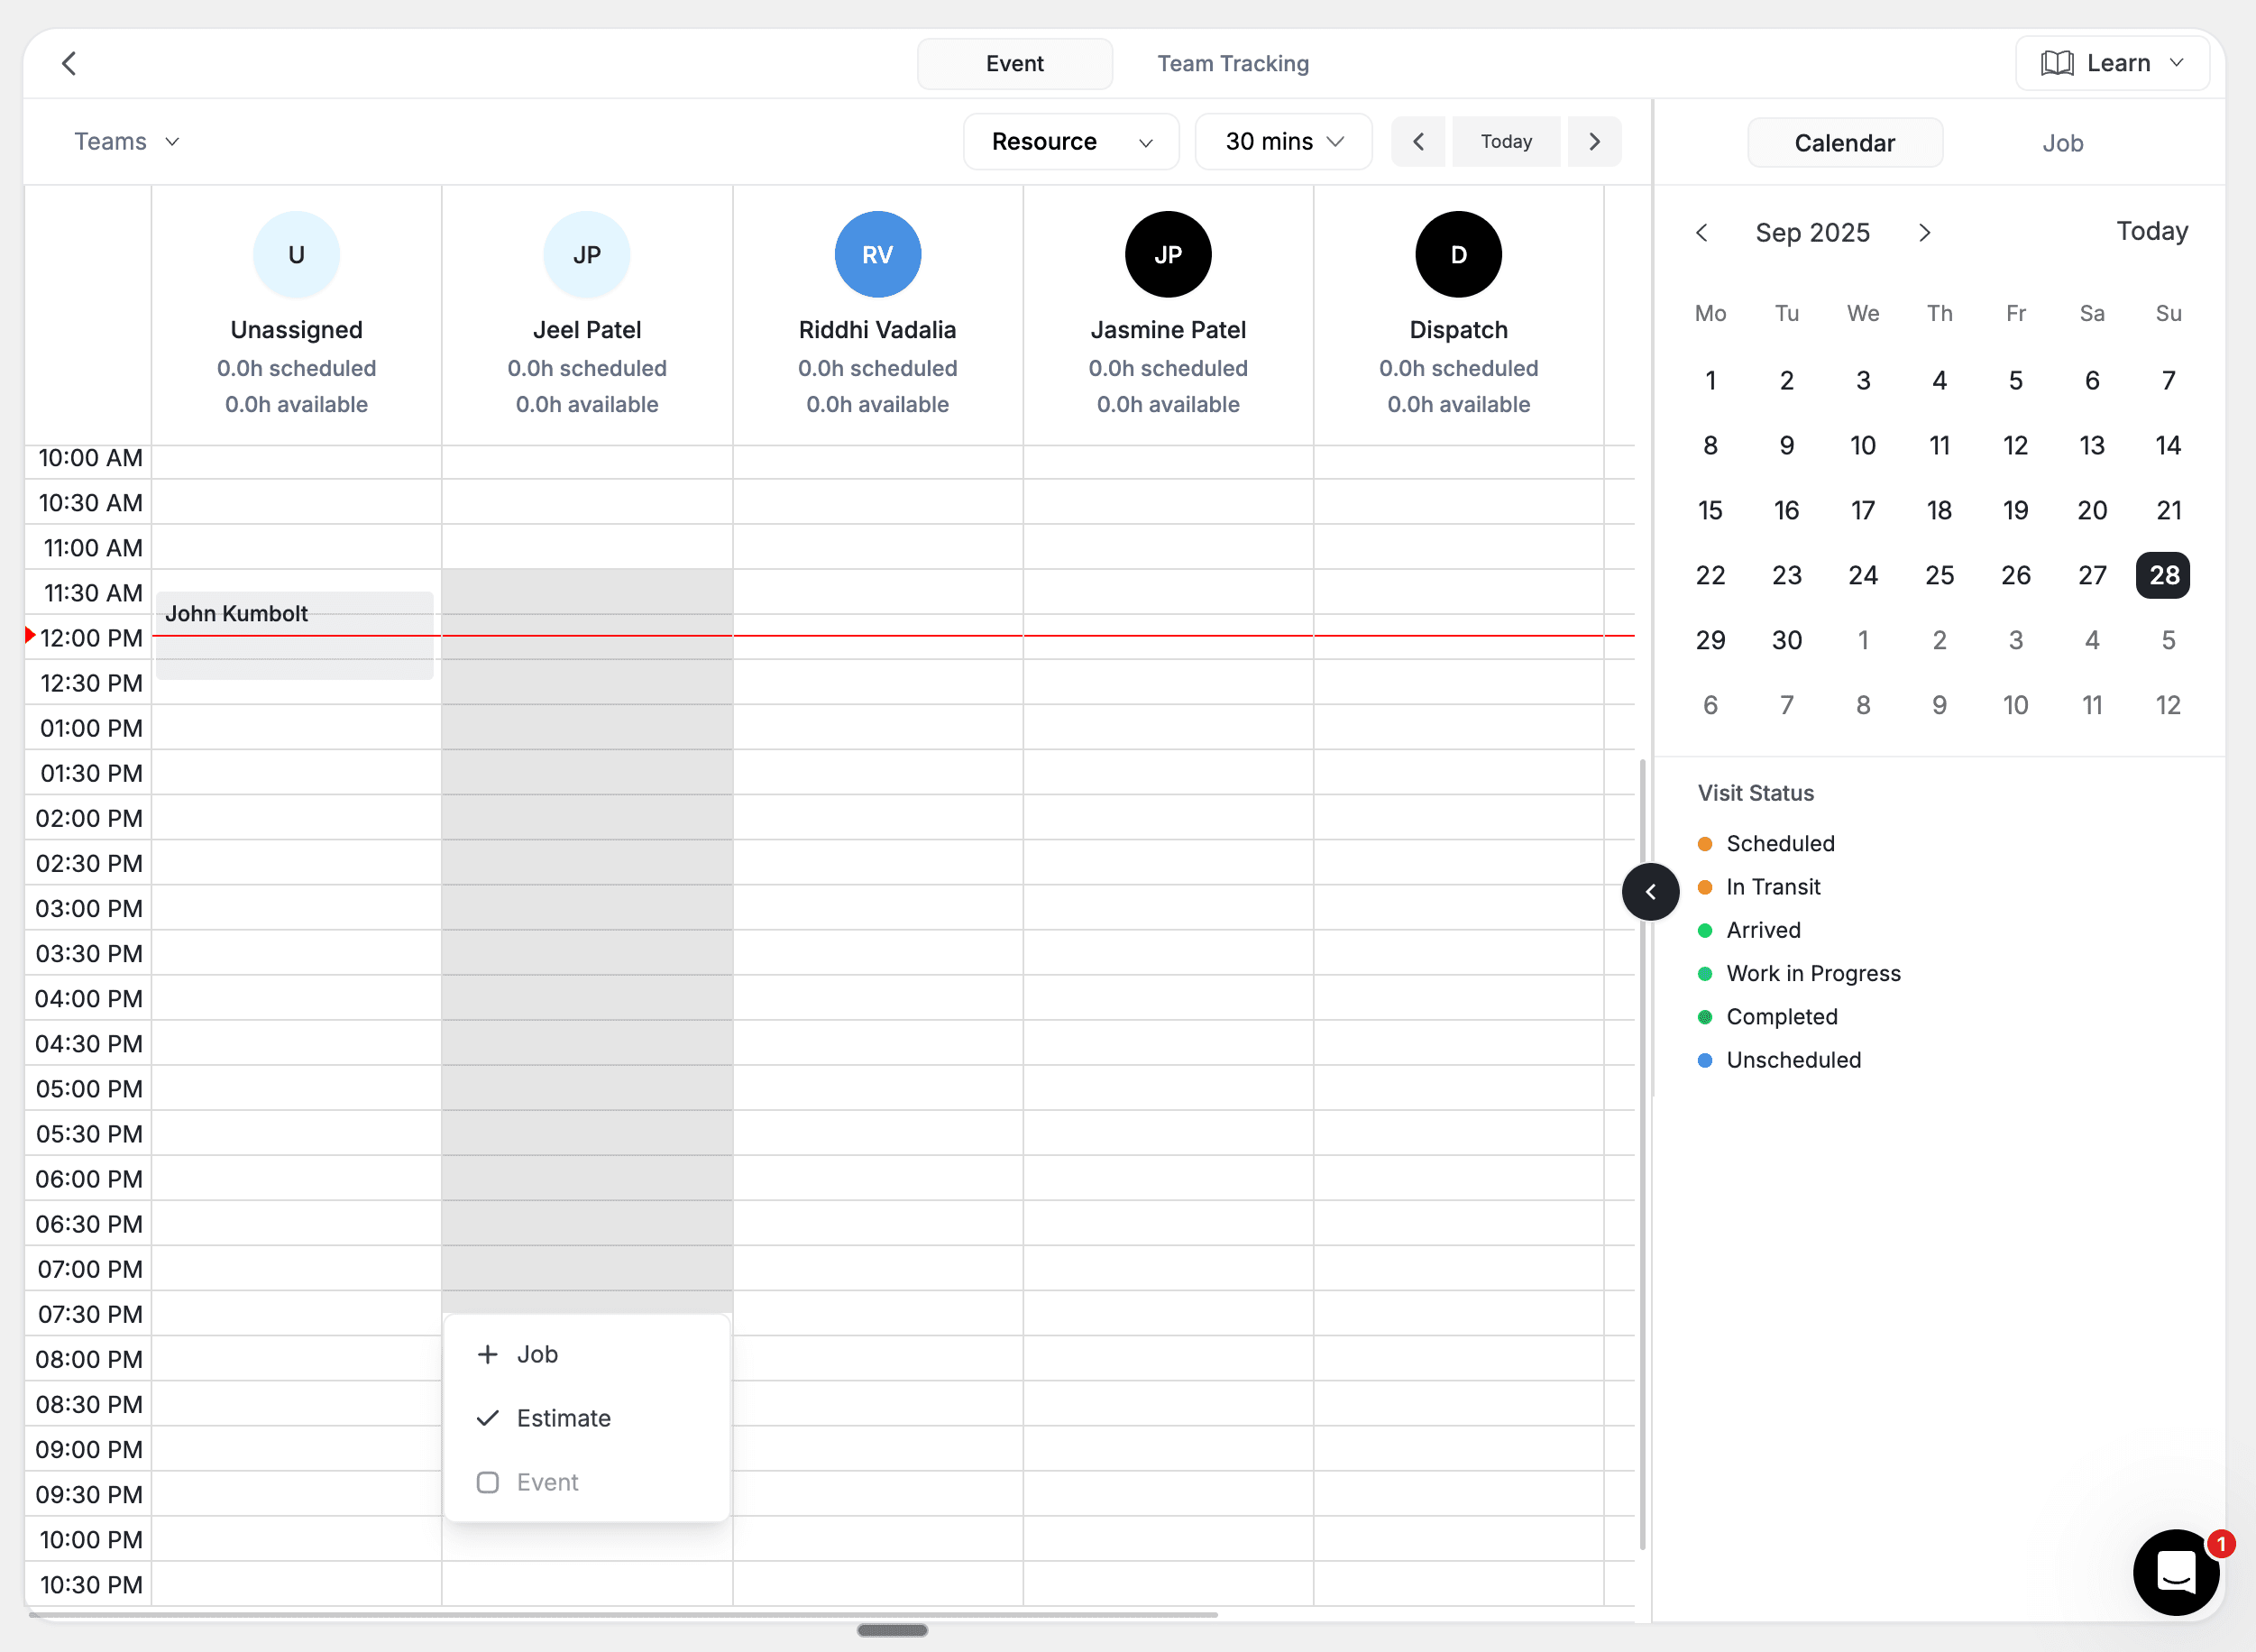
The Resource view flips the layout to vertical columns — one column per technician, with time running top to bottom. Each column shows a technician's complete daily schedule, making it easy to compare two or three people side by side. An Unassigned column on the left collects work that has no technician yet.
When to Use It
- Side-by-side comparison — check if two technicians can swap a job
- Individual planning — review one technician's full day in detail
- Skill-based assignment — compare workloads among qualified team members
- Fair work distribution — make sure no one is overloaded or underutilized
How It Works
Reading the board: Each column header shows the technician's name. Visits appear as blocks running vertically through their day. Gaps between blocks are open time.
Assigning: Drag from the Job Tray and drop into any technician's column at the desired time.
Rescheduling: Drag a visit up or down within a column to change the time, or across columns to reassign to a different technician.
Tips
- Focus on two or three technicians at a time for clearer comparison
- Use this view when you need to carefully balance workloads for the day
Map View
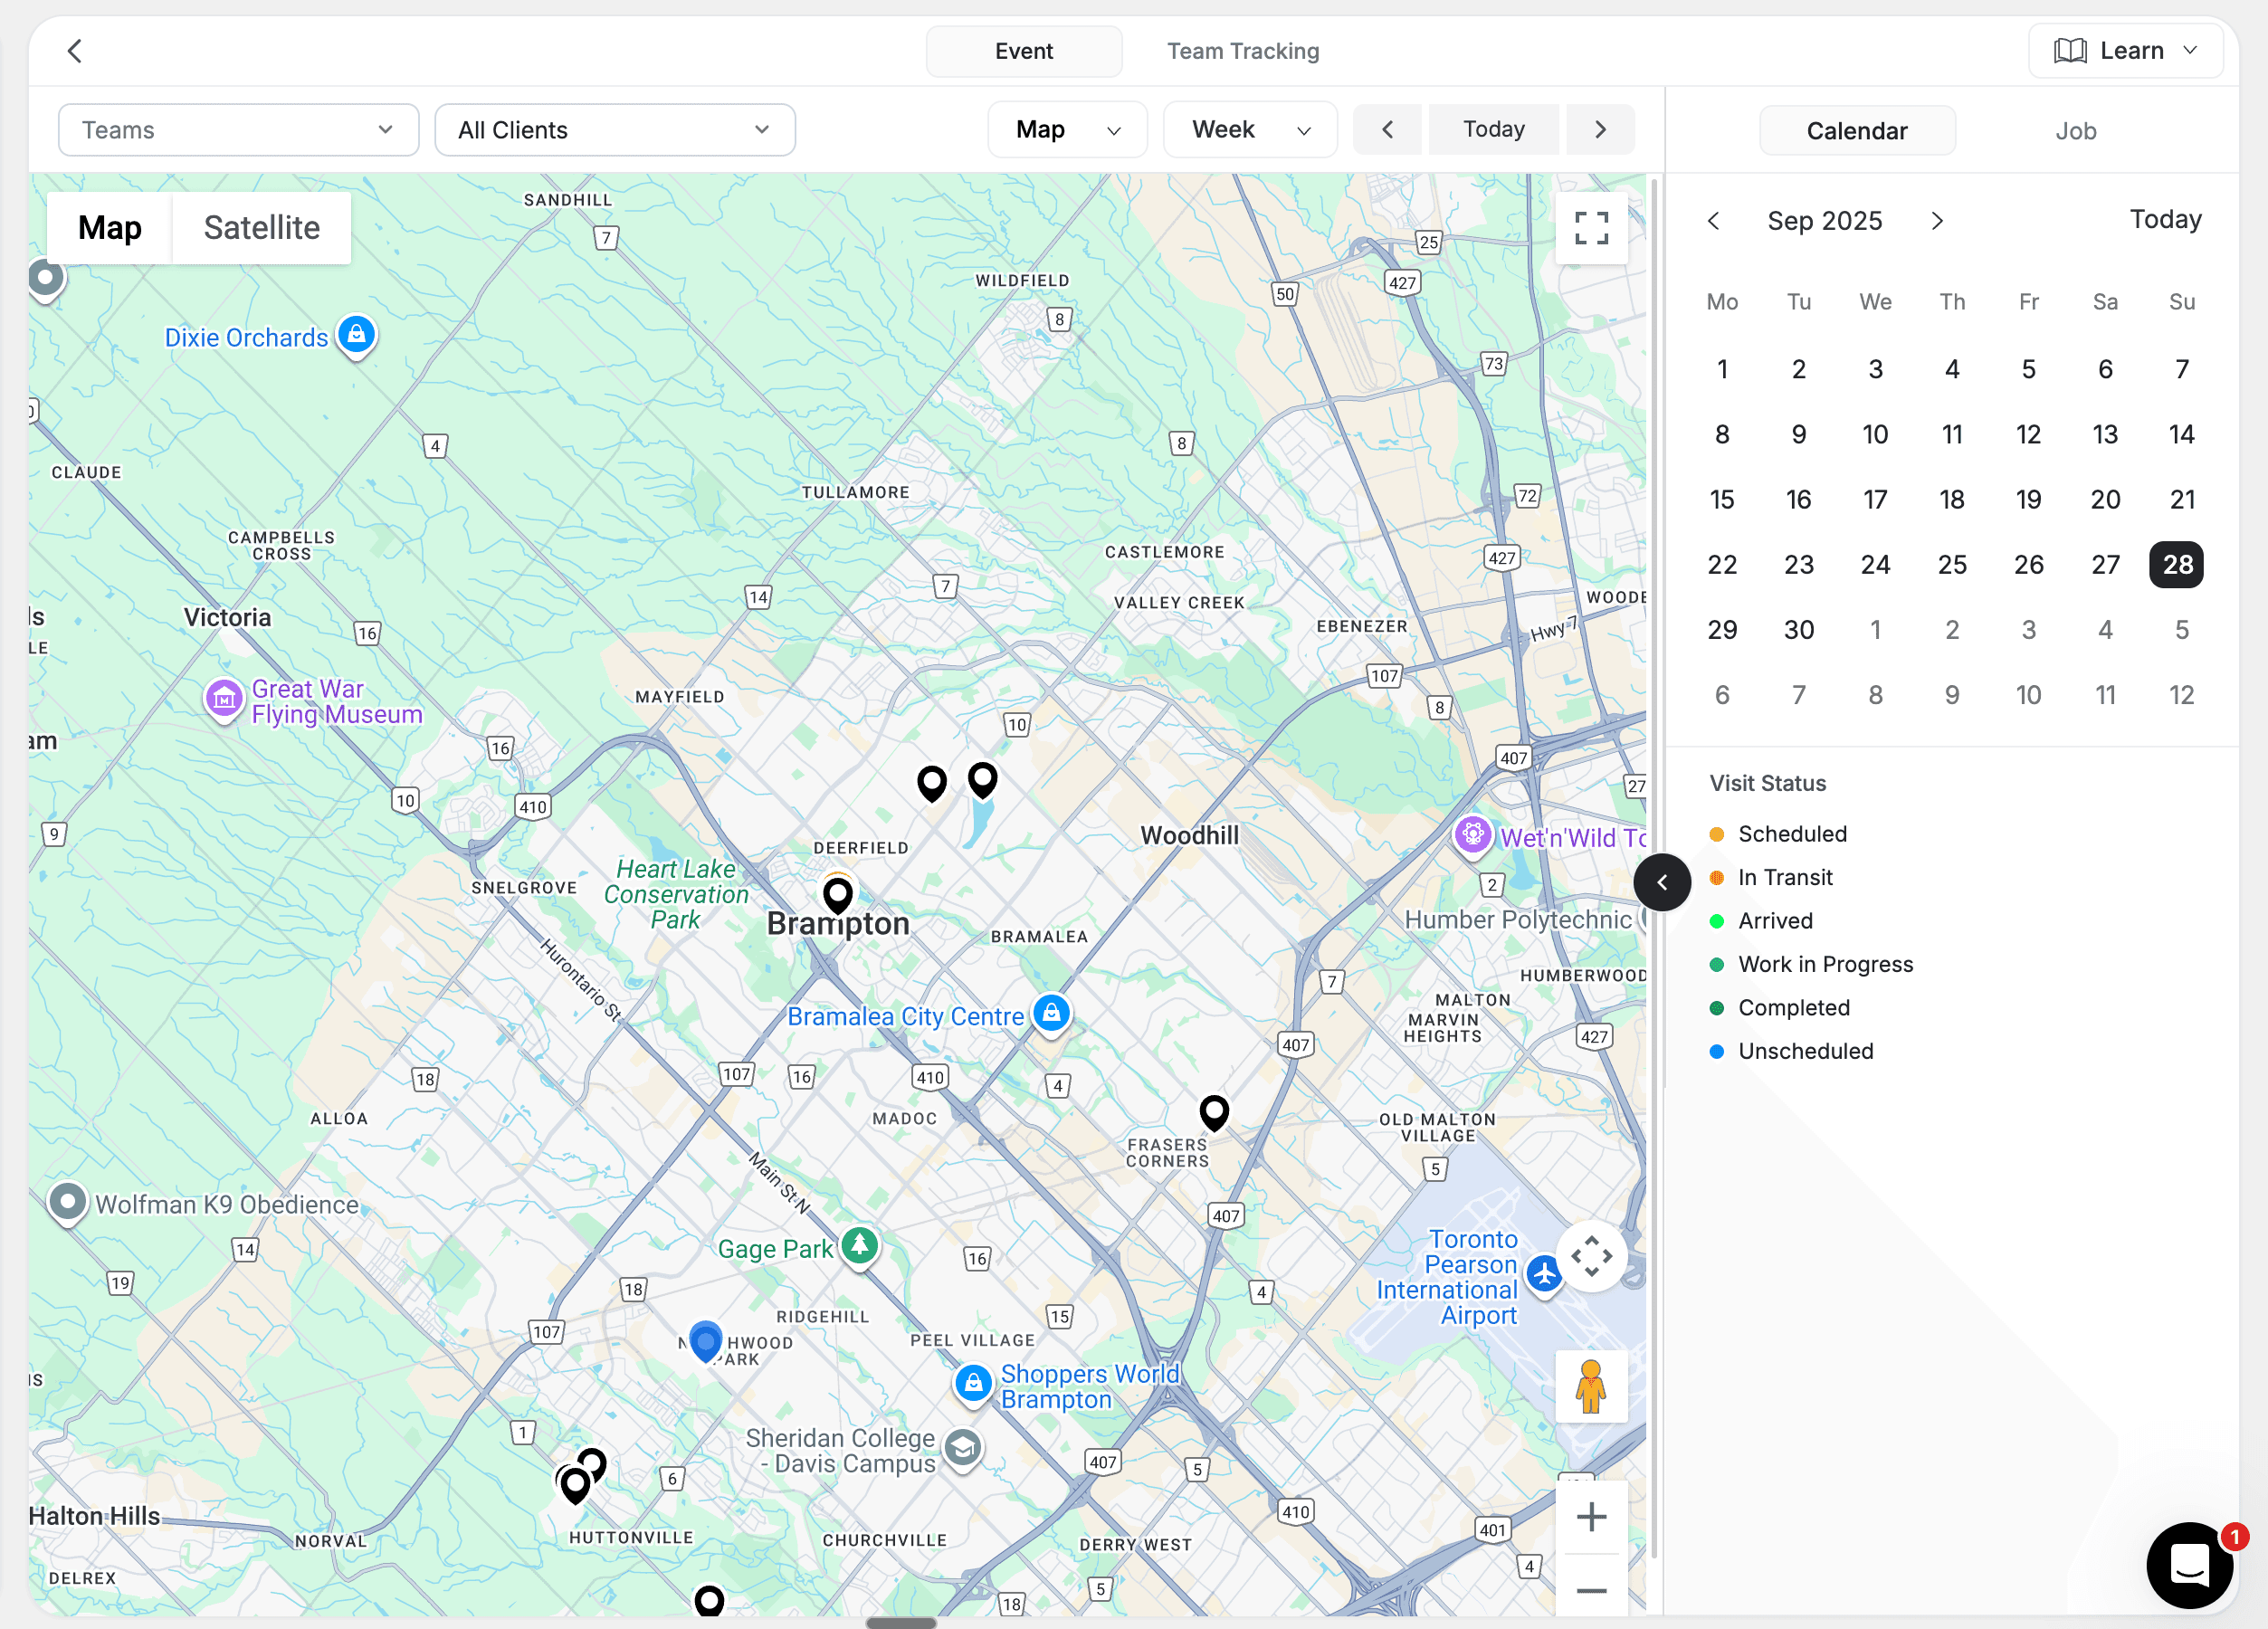
What It Is
The Map view plots all scheduled jobs and technician start locations on a Google Maps interface. Each job appears as a numbered pin in the technician's colour, and a home marker drops at each selected technician's start address when their route is optimized. This spatial layout reveals routing opportunities, geographic clusters, and coverage gaps that are invisible in time-based views.
When to Use It
- Route planning — group nearby jobs together to minimize driving
- Territory awareness — see how work is distributed geographically
- Emergency dispatch — find the nearest available technician to a new job
- New customer evaluation — check if a location fits within your service area
How It Works
Navigation: Zoom and pan with standard map controls. The map automatically fits bounds to include every selected technician's stops.
Job pins: Each pin is a scheduled visit and uses the assigned technician's colour, with the stop number stamped on top. Click a pin to see the address and client name in an info window.
Technician overlay: When you tick a team member in the side panel and their route is optimized, a home icon pins their start address and a coloured polyline traces their stop sequence. Use this overlay with Live Team Tracking to compare planned vs actual movement.
Routing: Use the map alongside Route Optimization to plan efficient paths through geographic clusters. Visits without coordinates are flagged in a separate panel so you can fix the address.
Tips
- Zoom out to spot geographic clusters of work — assign those clusters to the same technician
- Use this view alongside Timeline for location-aware dispatching
Color Modes
The new color toggle lives in calendar Preferences (open it from the toolbar). Pick how visit cards are coloured across every view:
Color by Status
The default. Cards take their colour from the visit status — Scheduled, Confirmed, Dispatched, In Transit, Arrived, In Progress, Paused, Completed, and Cancelled each get a distinct hue. Best when dispatchers need a quick read on what's happening right now.
Color by Type
Cards are coloured by visit type — One-Off, Recurring, Multi-Day, and First Visit. Helpful for capacity reviews and recurring-maintenance planning.
Color by Team
Each technician gets their own colour. Open Preferences, scroll to Team Member Colors, and pick a custom hex for any tech. This is the cleanest way to read the Timeline and Map when you're dispatching across many technicians.
Your colour-mode choice is stored as a company-level system setting, so the same palette shows up for every dispatcher on your account. Individual users can still override the event card layout (fields and density) through their own calendar preferences.
Filtering and Event Card Layout
The toolbar Filter dropdown narrows the calendar to a single slice of work — All, Unscheduled, Idle, Unassigned, or Anytime. Pair it with the visit type filter to drill in further.
Inside Preferences you can also tune the event card itself:
- Presets — Dispatcher (job number, client, address, status, tech), Technician (client, address, time window), Owner (client, type, job number, status), or Minimal (client name only).
- Fields — toggle any combination of Client Name, Job Number, Address, Status, Assigned Tech, Priority, Job Type, Time Window, Phone, Zip Code, or Linked Record.
- Density — Auto, Comfortable, or Compact. Comfortable shows the most detail; Compact squeezes more cards onto a screen for heavy dispatch days.
- View Options — toggle weekends on or off, and show details on hover.
The Job Tray and Unscheduled Visits
The Job Tray docks under the calendar in Timeline, Resource, and Calendar views. It now ships with a refreshed set of tabs that match how dispatchers actually work:
- Unassigned — work that needs a technician
- Scheduled — confirmed for a date and time
- In Progress — visits a tech has started
- Completed — wrapped today
- On Hold — paused mid-day for parts, weather, or customer delays
- Alerts — visits flagged by FieldCamp (e.g. expired arrival windows, missing data)
- Cancelled — kept on hand for quick reference
If your company uses a custom visit pipeline, the tabs automatically rebuild from your stage list, with Unassigned and Alerts pinned to either end.
When you create a visit with Schedule Later turned on, FieldCamp marks it as Unscheduled. Unscheduled visits show up:
- In the Job Tray under whichever stage they belong to (with a dash in the Time Window column)
- As a draggable card in the Unscheduled row of the Timeline view
- In the Unassigned column of the Resource view, if no technician is set
- Filtered into the calendar grid only when you set the toolbar filter to Unscheduled
Visits in scheduled, confirmed, dispatched, in_transit, arrived, in_progress, completed, and cancelled statuses cannot be dragged from the Job Tray in Calendar view — they already live somewhere on the grid. Switch to Timeline or Resource view to reshuffle these in place.
Mobile Calendar
On the FieldCamp mobile app, technicians see their schedule in three formats:
- List — a simple list of today's visits in chronological order
- Day — a visual timeline of the day's schedule
- Map — their assigned visits plotted on a map for route context
Dispatchers working from a phone can also access the full calendar views, though the desktop experience is recommended for complex dispatch work.
Switching Views
Use the view dropdown in the calendar toolbar to switch between Calendar, Timeline, Resource, and Map. Hit the star icon next to a view to mark it as your default. The choice is remembered per user, and the AI Dispatcher honours it when it opens the calendar from a Command Centre prompt.
All views share the same data. A visit dragged to a new time in Timeline view will instantly appear at the new time in Calendar, Resource, and Map views — and any colour-mode change cascades everywhere.
Troubleshooting
My Timeline view is missing rows for some technicians. Check that those team members are marked as schedulable and that the Teams filter in the toolbar is set to All Teams or has them selected. Inactive team members are hidden by default.
An unscheduled visit isn't showing up on the calendar grid. That's expected. Schedule Later visits appear in the Job Tray and Timeline's Unscheduled row, but only show on the dated grid when you flip the toolbar filter to Unscheduled. Drag the card onto the grid to give it a time.
The Map view is empty even though I have visits today. Either no technicians are selected in the side panel, or the visits are missing coordinates. FieldCamp pops up a "missing lat/long" panel — open the visit, save a valid address, and the pin will appear.
Color changes aren't sticking. Color mode is a company-level setting, so make sure you clicked Save Preferences in the drawer. If a single team member's colour isn't applying, confirm you set their colour in Team Member Colors rather than on their team profile.
The Alerts tab is empty even though I'm sure something is overdue. Alerts only fire when the calendar can see the conflict — for example, an arrival window that has expired or a visit assigned to a technician who is unavailable. Open the visit detail to see the full alert reason.
FAQs
Can I have a different colour mode in Timeline vs Calendar view? No. The colour mode is global so the visit looks the same no matter where you read it.
Does the Map view show real-time technician positions? The Map's home markers show the technician's start address. Real-time GPS pins come from Live Team Tracking, which dispatchers can open alongside the Map.
Why are some Job Tray tabs different on my account? Tabs are built from your visit pipeline. If you've customised stages in Pipeline Stages & Configuration, your tabs will reflect those names.
Can I bulk reassign every visit from a tech who called in sick? Yes — open the technician's row in Timeline view and use Bulk Reassign to move their day to one or more other techs in one step.
Where do unscheduled visits go after I drag them onto the calendar?
They convert to scheduled status (or whatever the next stage in your pipeline is) and stop appearing under the Unscheduled filter and the Timeline's Unscheduled row.
Related articles
Calendar Overview | FieldCamp
Your scheduling command center in FieldCamp. Four calendar views, a job tray, route optimization, and live team tracking — all in one place for dispatchers.
Job Tray & Dispatch | FieldCamp
Dispatch jobs from the Job Tray using drag-and-drop. Assign technicians, resolve conflicts, bulk reassign, and use AI suggestions to optimize your day.