 FieldCamp
Building Workflows | FieldCamp
Step-by-step guide to creating workflows in FieldCamp. Set up triggers, add conditions, configure actions, and test your automations before going live.
Under the hood — see how Automations work in the FieldCamp data model: the fields they hold, how they connect to your other records, and how to customize them.
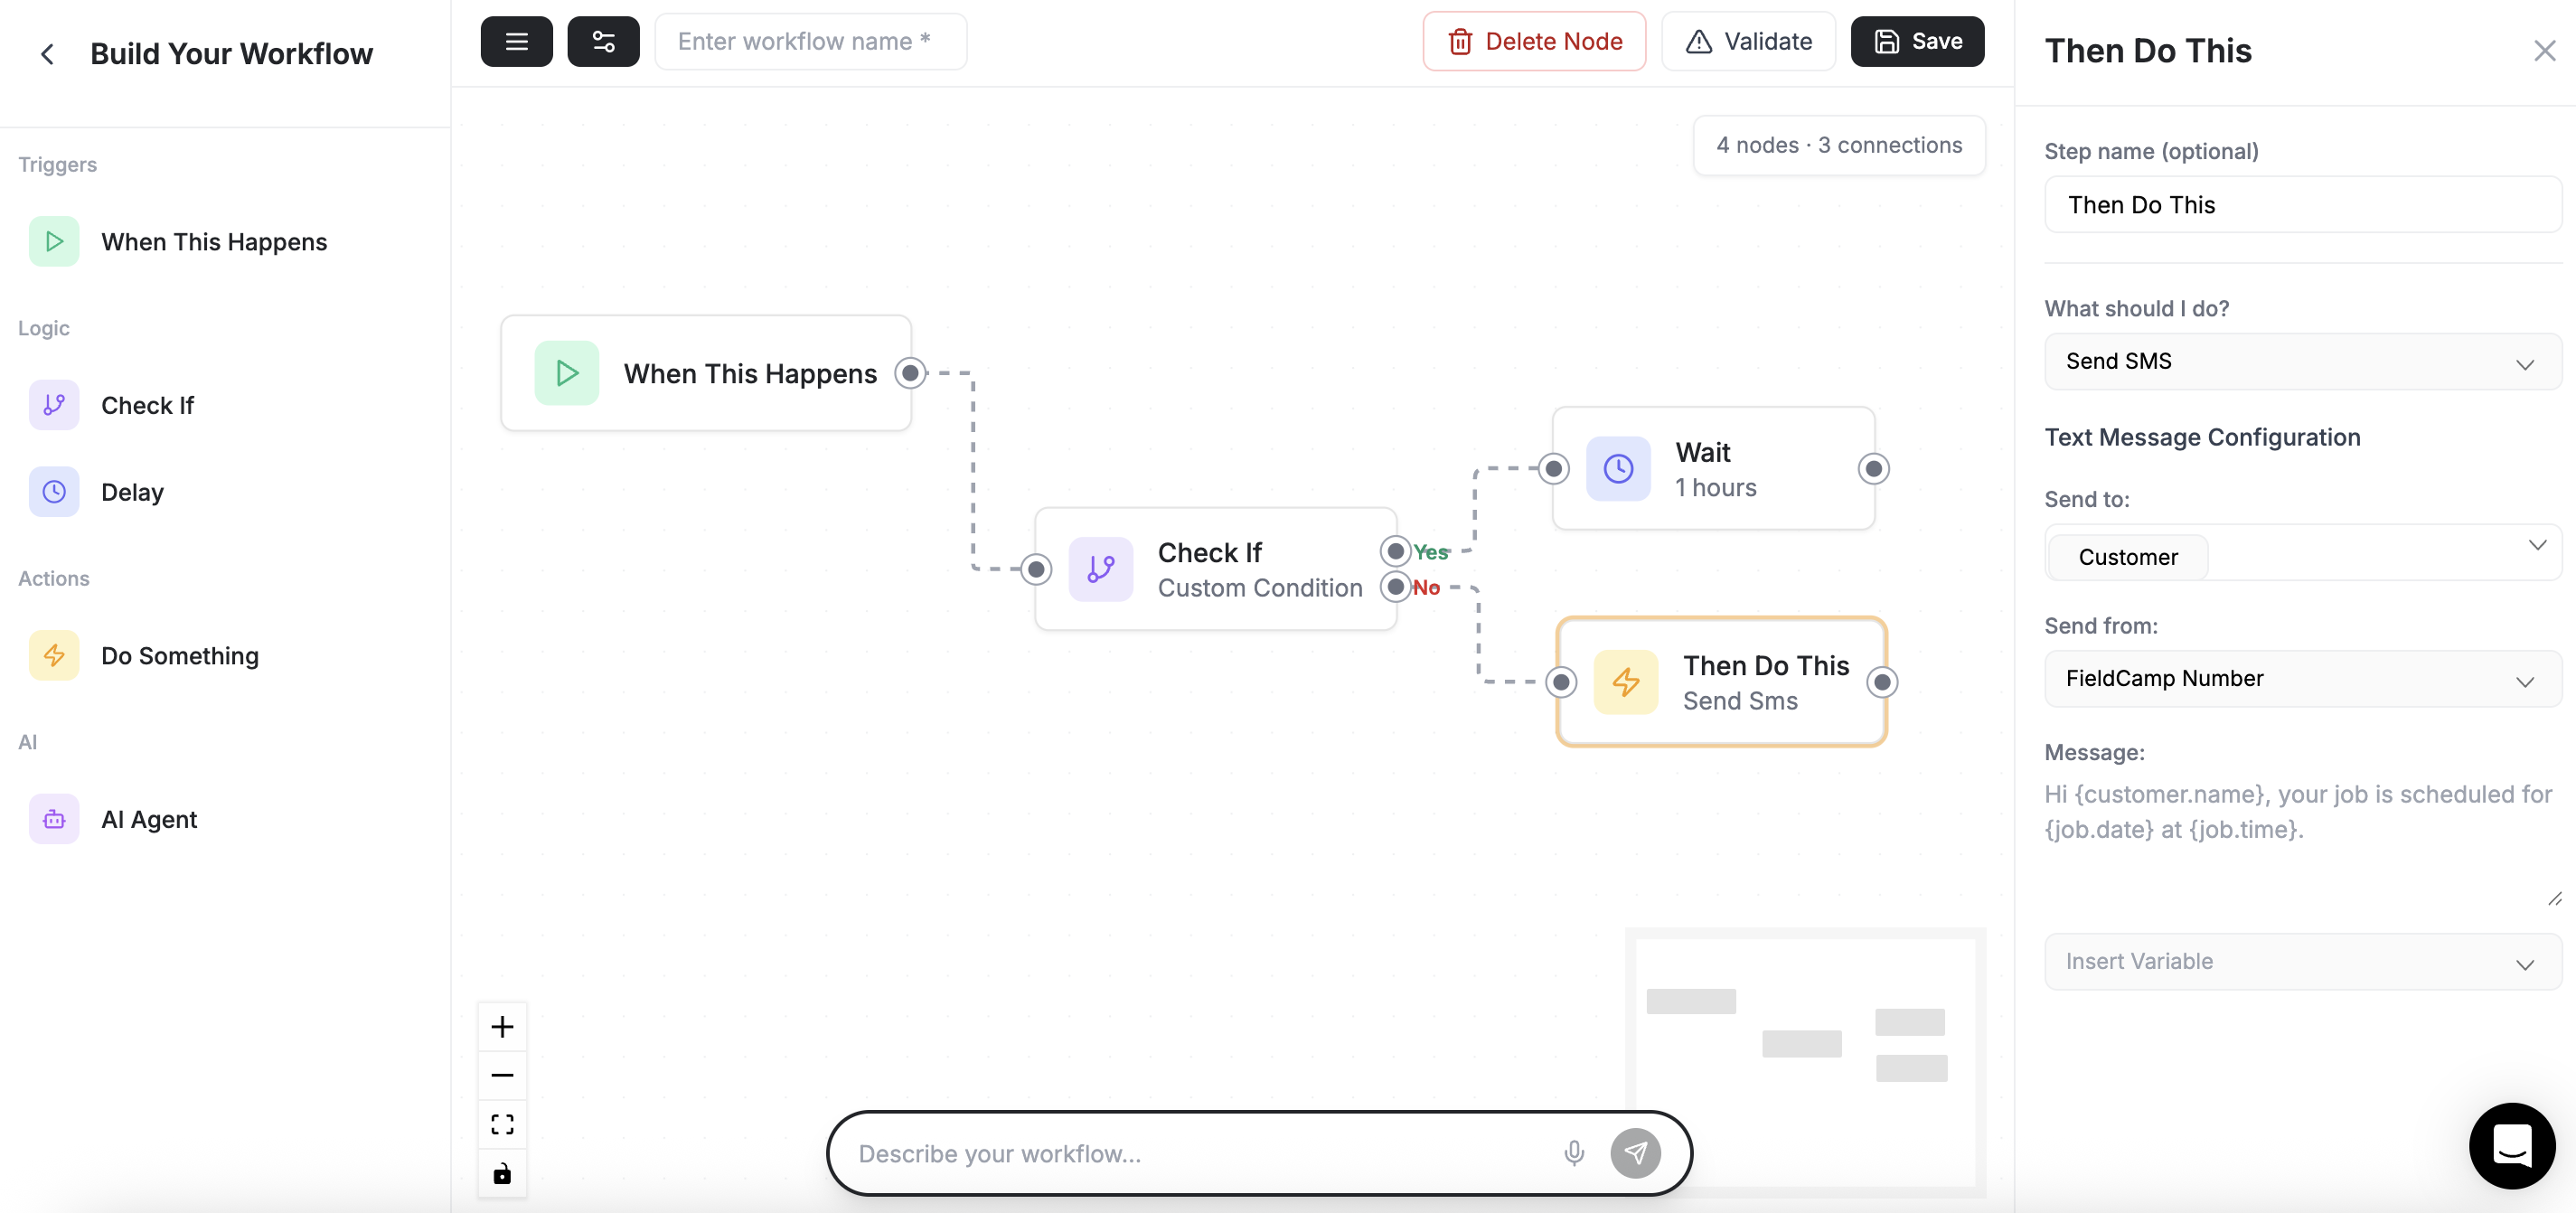
The workflow builder is where you create custom automations for your business. You pick what starts the workflow, set any filters, choose what happens, and activate it. No coding required. You can also describe what you want in the Command Centre and let the AI build the workflow for you.
Creating Your First Workflow
Step 1: Open the Workflow Builder
Go to Settings → Workflow Automation and click + Create New Workflow.
The Workflow Automation add-on must be enabled in Settings > Add-ons before you can create workflows.
You will see a visual canvas with four building blocks:
- When This Happens — define the trigger event
- Smart Decisions — set conditions and filters
- Take Action — choose what FieldCamp does
- Wait or Repeat — control timing and scheduling
Step 2: Name Your Workflow
Click the workflow name at the top (it defaults to "Untitled Workflow") and give it a clear, descriptive name. For example: "Send confirmation email when visit is scheduled" or "Create invoice on job completion."
Step 3: Choose a Trigger
The trigger is the event that starts your workflow. Click When This Happens and select from the available triggers.
Available Triggers
| Trigger | When It Fires |
|---|---|
| New client is created | A new client is added to your account |
| New job is created | A new job is created |
| Job completed | A job status changes to "Completed" |
| Job status is updated | Any change to a job's status |
| Visit status is updated | Any change to a visit's status (scheduled, in progress, completed) |
| Visits are scheduled | One or more visits are added to the calendar |
| Estimate sent | An estimate is sent to a client |
| Invoice sent | An invoice is sent to a client |
| Payment received | A payment is recorded |
| Request stage changed | A request moves to a new stage |
Each trigger gives you access to related data. For example, the "Job completed" trigger lets you use the job name, client email, assigned technician, and job value in your conditions and actions.
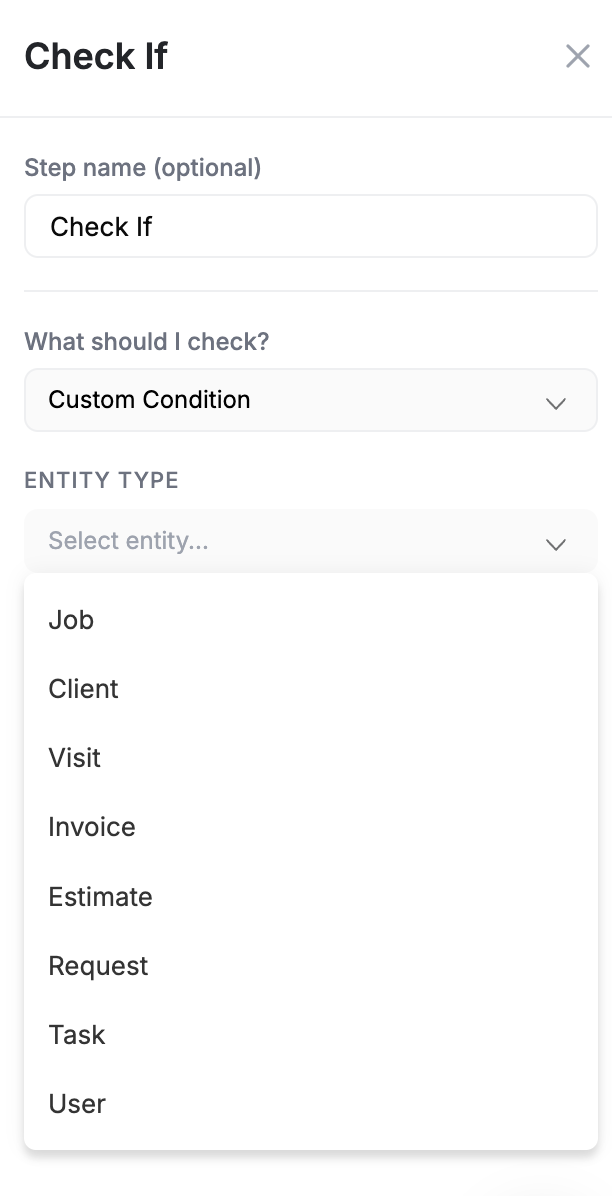
Step 4: Add Conditions (Optional)
Conditions let you filter when the workflow should run. Click Smart Decisions to add rules.
Available Conditions
| Condition Type | Examples |
|---|---|
| Priority level | Only run for high-priority jobs |
| Client type | Only for commercial clients, not residential |
| Job value | Only when the job is worth more than $500 |
| Status change | Only when status changes to a specific value |
| Team member | Only for jobs assigned to a specific technician |
| Service type | Only for HVAC jobs, or only for plumbing |
| Location | Only for clients in a specific city or zip code |
You can combine multiple conditions. For example: run only when the job is high priority and the client is a commercial account.
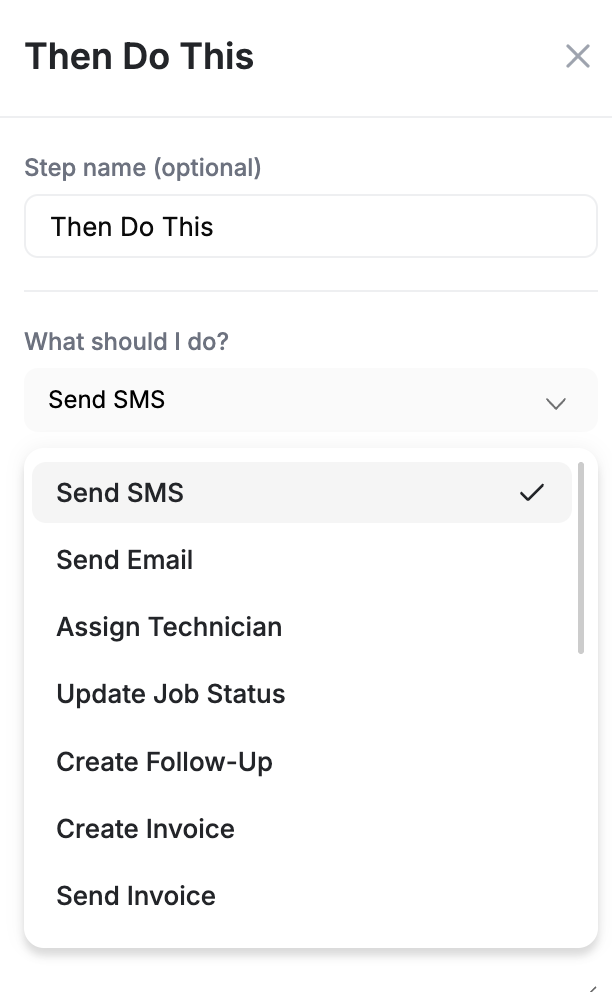
Step 5: Configure Actions
Actions are what FieldCamp does when the workflow fires. Click Take Action and choose from the available options.
Available Actions
| Action | What It Does |
|---|---|
| Send email | Send an email to the client, technician, or any address |
| Send SMS | Send a text message to the client or team member |
| Update status | Change a job or visit status automatically |
| Assign team member | Assign or reassign a technician to a job |
| Create task | Generate a follow-up task for your team |
| Create invoice | Build an invoice from the completed job |
| Update record | Modify job, client, or visit details |
| Send notification | Push a notification to team members in FieldCamp |
You can add multiple actions to a single workflow. They run in the order you set them.
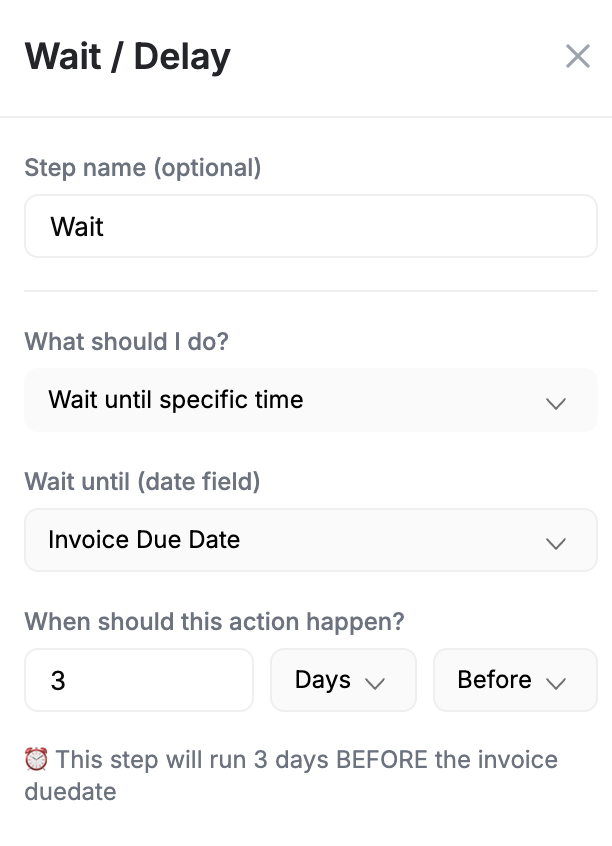
Step 6: Set Timing
Control when actions happen:
| Timing Option | How It Works |
|---|---|
| Immediate | Action runs as soon as the trigger fires |
| Delay | Wait a set amount of time (e.g., 3 days after job completion) |
| Schedule | Run at a specific date and time |
| Repeat | Run on a recurring schedule (daily, weekly, monthly) |
Delays are useful for follow-ups. For example, send a review request email 2 days after the job is completed, not immediately.
Step 7: Save and Activate
- Click Save to store your workflow
- Review the workflow in your list
- Toggle the status to Active when you are ready
The workflow will start running the next time its trigger event occurs.
Testing Your Workflow
Before activating a workflow for all your clients, test it:
- Create the workflow and leave it inactive
- Review each step — check the trigger, conditions, and actions
- Activate and trigger a test event — for example, create a test job to see if the workflow fires correctly
- Check the execution log — click View on the workflow to see if it ran successfully
- Verify the action — confirm the email was sent, the invoice was created, or the status was updated
If a workflow fails, check the execution log for error details. Common issues include missing client email addresses or incomplete job details.
Managing Your Workflows
Enable and Disable
Toggle any workflow between Active and Inactive from the workflow list. Inactive workflows will not fire, even if the trigger event occurs.
View Execution History
Click View on any workflow to see:
- Every time the workflow ran
- Whether each run succeeded or failed
- Error messages for failed runs
- How long each step took
Edit a Workflow
Click on any workflow to reopen the builder. Make your changes and click Save. The updated workflow applies to all future trigger events.
Monitor Performance
Keep an eye on these metrics for each workflow:
- Total Runs — how many times it has executed
- Success Rate — percentage of runs that completed without errors
- Last Run — when it most recently fired
- Failed Runs — number of unsuccessful attempts
Troubleshooting
Workflow Is Not Triggering
- Confirm the workflow status is set to Active
- Verify the trigger event is actually occurring (e.g., the job status is changing to the expected value)
- Check that conditions are not filtering out every event
Actions Are Not Running
- Make sure all required fields are filled in (e.g., client email for "Send email" actions)
- Check that the recipient information is valid
- Review the execution log for specific error messages
Low Success Rate
- Look at failed execution logs to find the pattern
- Simplify complex conditions to narrow down the issue
- Verify any connected integrations (like QuickBooks) are still active
Next Steps
- Browse workflow templates for ready-made automations
- See real-world examples you can copy for your business
- Return to the workflow overview for the big picture
Workflow Automation Overview | FieldCamp
Automate repetitive tasks like sending emails, creating invoices, and notifying your team. Learn how FieldCamp workflows use triggers, conditions, and actions.
Workflow Templates | FieldCamp
Browse pre-built workflow templates for field service automation. Install and customize templates for invoicing, client updates, payment reminders, and more.