 FieldCamp
FieldCamp Settings: Every Setting Explained
Complete reference for every FieldCamp setting. Company info, jobs, scheduling, billing, automation, integrations, and customer experience configuration.
Under the hood — the FieldCamp data model shows how every record connects, how you can customize it, and how it maps to your trade.
How to Open Settings
Click the gear icon in the bottom-left corner of the sidebar, or click Settings from the sidebar. You can also ask the Command Centre to help you find and configure settings. The Settings page opens with a left-hand menu organized into sections. For help navigating the sidebar, see Navigating FieldCamp.
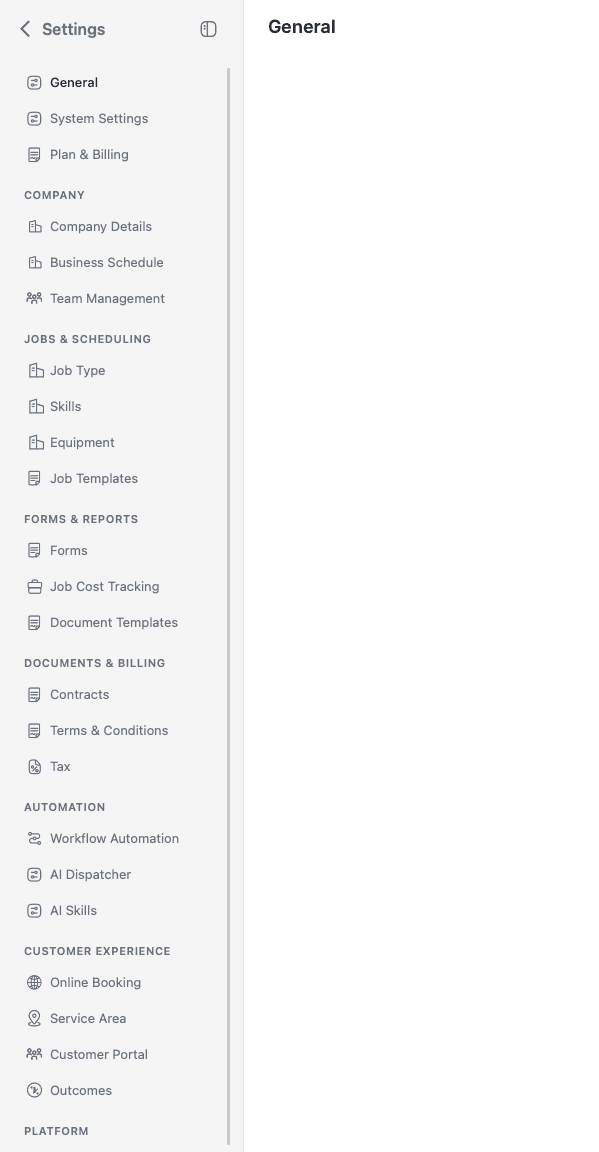
Note: Some settings only appear if you have the right role permissions or if certain add-ons are enabled. If you don't see a setting listed below, check that the relevant add-on is turned on in Settings > Apps & Integrations.
General Settings
General
Your personal profile. Update your name, email address, phone number, and password. This is your account-level information, not your company details.
Path: Settings > General
System Settings
Workspace-wide operational defaults organized into Documents, Jobs, and Calendar tabs. Configure invoice and estimate prefixes and next numbers; Smart Scheduling defaults; job conflict detection; estimate phase margins; site measurements; default service duration; calendar display mode; and visit type colors.
Path: Settings > System Settings
Time zone and currency are configured under Company Details, not System Settings.
Notifications Settings
Choose which notifications each role receives for assignments, schedule changes, and Inbox messages. Use the role matrix to switch individual notifications on or off, then save the workspace-wide preferences. See Notifications Settings for the complete workflow.
Path: Settings > Notifications Settings
Plan & Billing
View the current subscription and billing details. This item is restricted to the account owner — invited team members do not see it. See Plan & Billing for pricing and plan management.
Path: Settings > Plan & Billing
AI Usage
Review the remaining AI dollar balance, team usage, purchases, transactions, and monthly analytics. This item is restricted to the account owner — invited team members do not see it. See AI Usage for details.
Path: Settings > AI Usage
Company
Company Details
Your business name, logo, address, phone number, website, time zone, and currency. This information appears on invoices, estimates, and customer-facing documents. Upload your company logo and set regional preferences here. See the Quick Start guide for a walkthrough.
Path: Settings > Company Details
Business Schedule
Set your company's working hours for each day of the week. This schedule is used as the default for job scheduling, calendar views, and availability calculations. You can also set individual team member schedules that override the company default.
Path: Settings > Business Schedule
Team Management
Add, edit, and remove team members. Assign roles, set labor rates (hourly, overtime, emergency), add skills, configure start/end addresses for routing, and manage the Assignable to Jobs toggle. Click on any team member to edit their profile and permissions. See Adding & Managing Team Members for step-by-step instructions.
Path: Settings > Team Management
API Tokens
Create and revoke the personal tokens that let external tools and AI assistants call FieldCamp on your behalf. A token is shown once when you create it. Only workspace owners can create tokens. See FieldCamp MCP Server for connecting an AI assistant, and Managing API keys for the developer workflow.
Path: Settings > API Tokens
Jobs & Scheduling
The Jobs & Scheduling section is available to Account Owners, Admins, and Dispatchers. Job Type Presets, Skills, and Equipment do not require AI Dispatcher. Job Templates has its own Multi-Day Job Templates add-on requirement.
Job Type Presets
Define categories for your jobs (for example, Repair, Installation, Maintenance). Job types help organize your work and can be used in workflow automations and AI Dispatcher routing.
Path: Settings > Job Type Presets
Skills
Define skills that can be assigned to team members and required for jobs. AI Dispatcher uses skills to match the right technician to each job.
Path: Settings > Skills
Equipment
Manage equipment that team members need for specific jobs. Track what equipment is available and assign it as needed.
Path: Settings > Equipment
Open Dispatch Equipment settings to configure quantities, crew transfers, handoff strategies, depot locations, buffer time, and inspection requirements.
Job Templates
Create reusable templates for multi-day or recurring jobs. This setting only appears when the Multi-Day Job Templates add-on is enabled.
Path: Settings > Job Templates
Forms & Reports
Forms
Build custom checklists and inspection forms that technicians fill out on-site. Create form templates with various field types (text, checkbox, photo, signature, dropdown). This setting only appears when the Forms add-on is enabled.
Path: Settings > Forms
Job Cost Tracking
Configure how FieldCamp calculates labor costs, travel time, and profit margins for each job. Set default labor rates and cost tracking rules. This setting only appears when the Job Logs add-on is enabled.
Path: Settings > Job Cost Tracking
Document Templates
Customize the look of your invoices, estimates, and reports when exported as PDFs. Add your logo, adjust layout, and configure what information appears on each document type.
Path: Settings > Document Templates
Documents & Billing
Contracts
Create and manage contract templates. Contracts can be attached to jobs, clients, or estimates. Define standard terms, scope of work, and signature requirements.
Path: Settings > Contracts
Terms & Conditions
Write default terms and conditions that appear on your invoices and estimates. You can create multiple versions for different use cases.
Path: Settings > Terms & Conditions
Tax
Configure tax rates for your business. Add multiple tax rates if you operate in different jurisdictions. Tax rates are applied to line items on invoices and estimates.
Path: Settings > Tax
QuickBooks
Connect and configure your QuickBooks Online integration. Map FieldCamp accounts to QuickBooks categories, sync invoices, and manage the connection status. See Connecting Your Accounting Software for setup instructions.
Path: Settings > QuickBooks
This item only appears once QuickBooks is connected in Settings > Apps & Integrations.
Automation
Workflow Automation
Build automated workflows that trigger actions based on events. For example, send an email when a job is completed, create a follow-up task when an invoice is overdue, or notify a team member when a new request comes in. Uses a visual builder with triggers, conditions, and actions. See The FieldCamp Workflow for how automation fits into the overall flow.
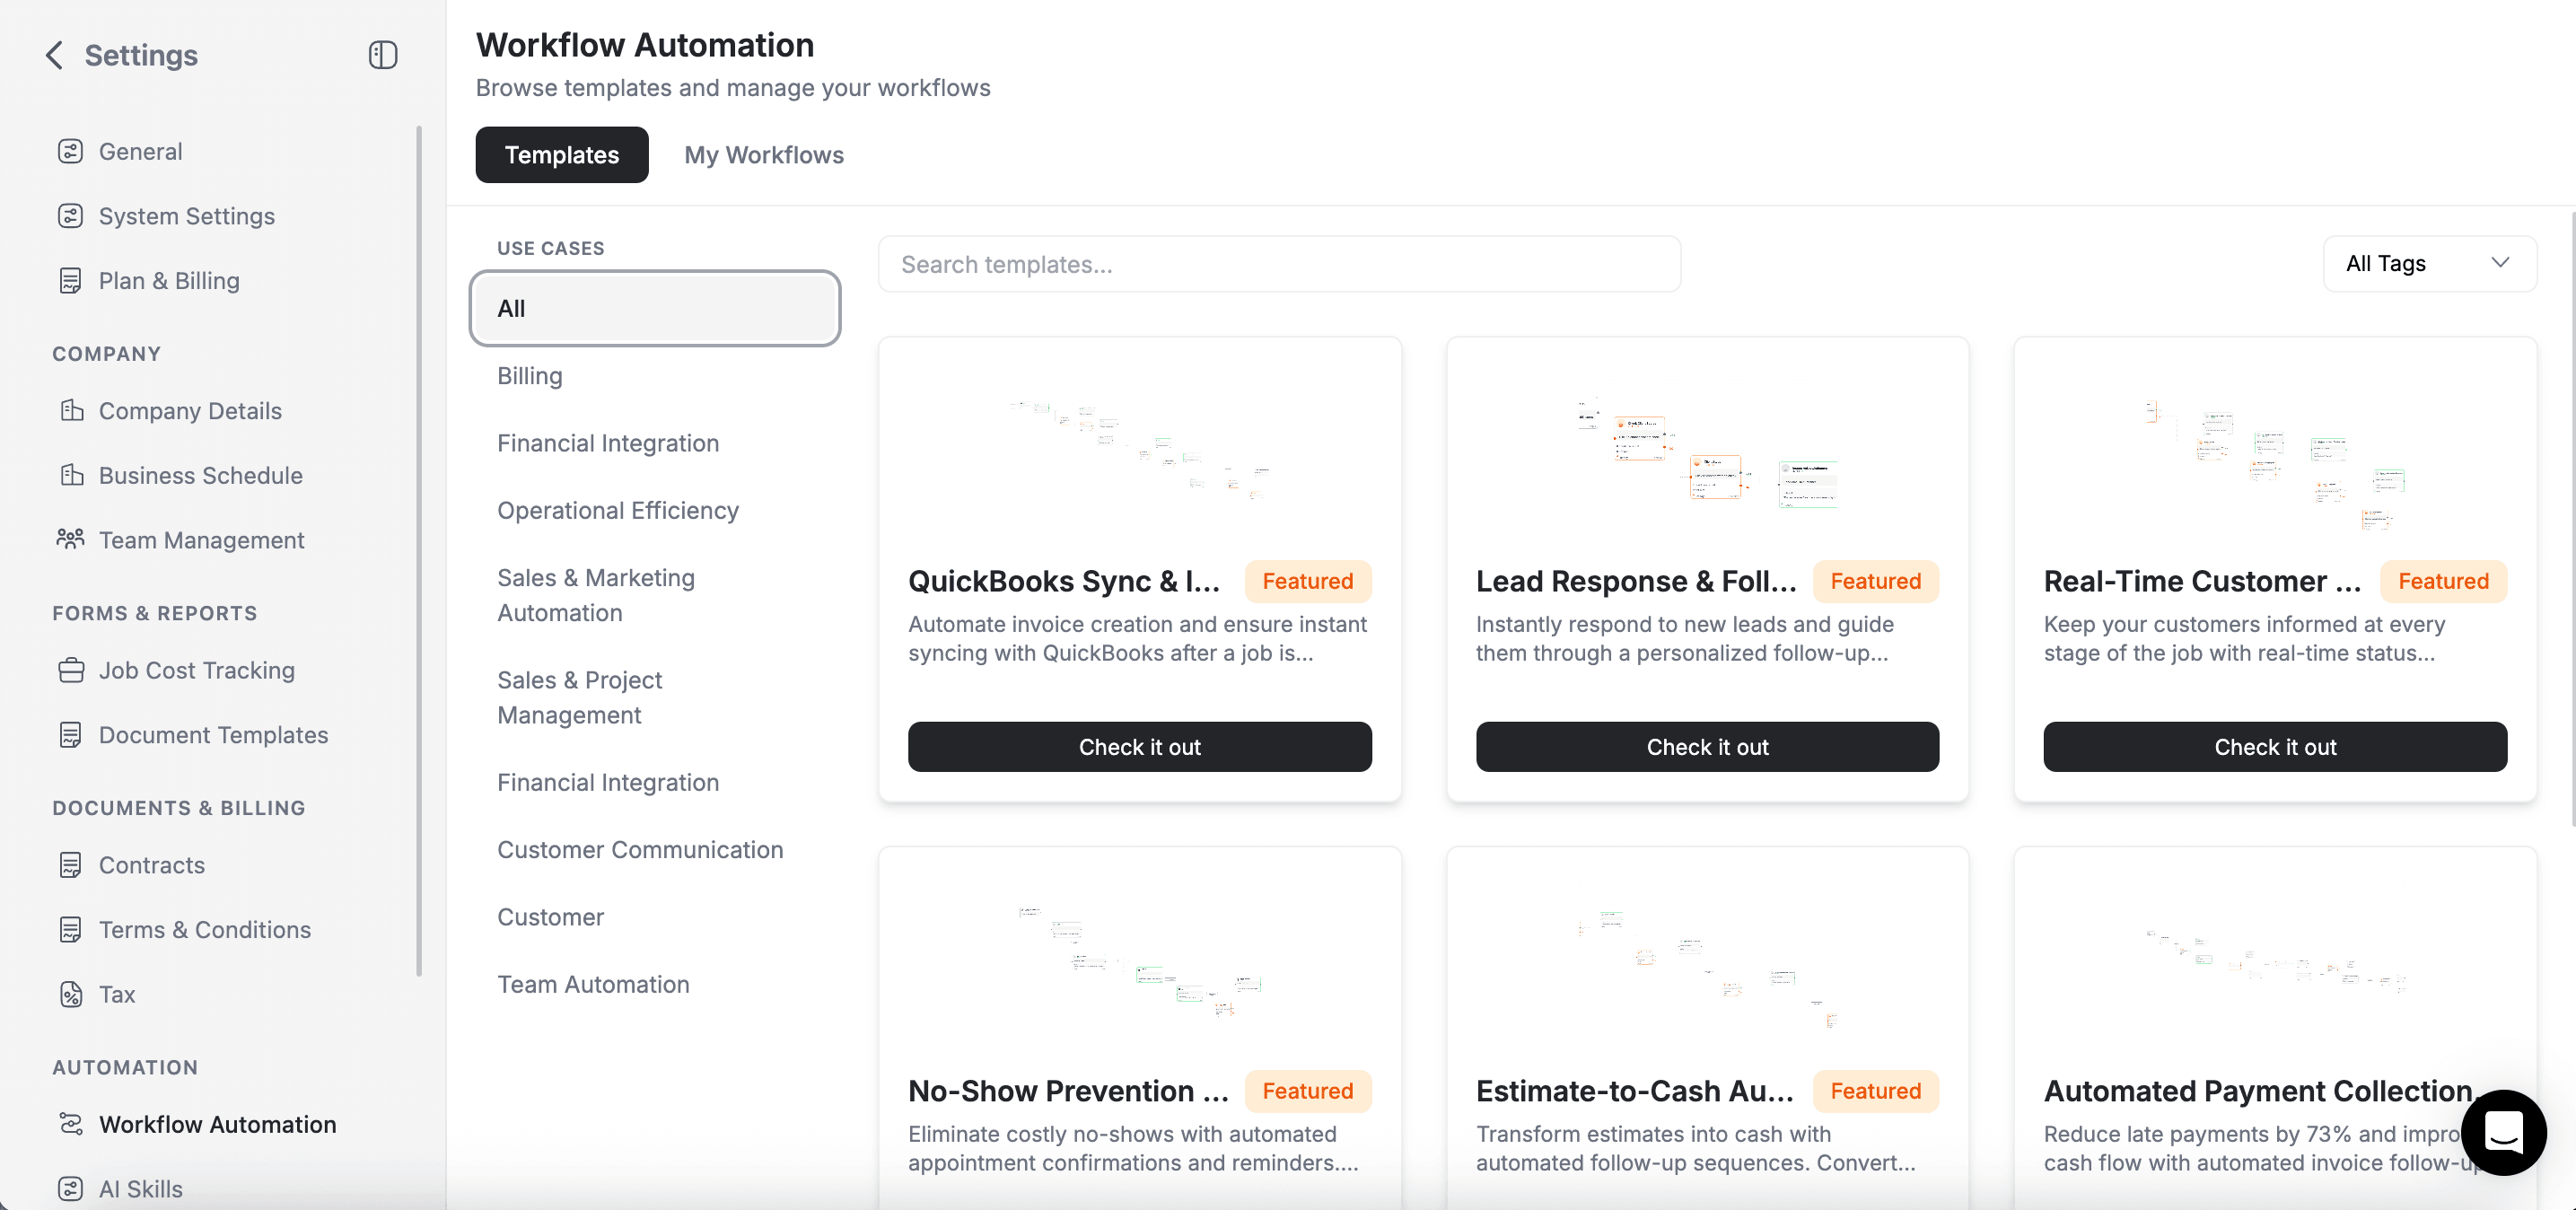
Path: Settings > Workflow Automation
AI Dispatcher
Configure AI-powered job dispatching. Set routing preferences, team member priorities, and scheduling rules. AI Dispatcher automatically assigns jobs to the best available technician based on skills, location, and availability. This setting only appears when the AI Dispatcher add-on is activated.
Path: Settings > AI Dispatcher
AI Skills
Configure AI-powered features and skills. Manage how AI assists with tasks like job summarization, customer communication suggestions, and smart scheduling.
Path: Settings > AI Skills
MCP Servers
Register the AI assistants and IDE clients that connect to your workspace over MCP, and generate the token each one uses. See FieldCamp MCP Server.
Path: Settings > MCP Servers
Customer Experience
Online Booking
Set up a booking page where customers can schedule service appointments online. Configure available time slots, services, and booking form fields. This setting only appears when the Online Booking add-on is enabled.
Path: Settings > Online Booking
Service Area
Define the geographic areas your business serves. Draw boundaries on a map or specify zip codes. Used by Online Booking and AI Dispatcher to validate service requests. This setting only appears when the Service Area add-on is enabled.
Path: Settings > Service Area
Customer Portal
Configure a self-service portal where your customers can view their jobs, invoices, and estimates. Customers can approve estimates, pay invoices, and track job progress. This setting only appears when the Customer Portal add-on is enabled.
Path: Settings > Customer Portal
Outcomes
Define outcome categories for calls and customer interactions. Track the result of each call (for example, Appointment booked, Follow-up needed, Issue resolved). This setting only appears when the Calls add-on is enabled.
Path: Settings > Outcomes
Saved Replies
Maintain the canned responses your team inserts while replying in the Inbox. Available to dispatcher-level roles and above. See Saved replies.
Path: Settings > Saved Replies
Message Templates
Edit the wording of the messages FieldCamp sends automatically — booking confirmations, payment reminders, review requests and AI agent messages. Available to dispatcher-level roles and above. See Message Templates.
Path: Settings > Message Templates
Platform
Apps & Integrations
The central hub for connecting external services and enabling add-on features. Connect Gmail, Google Calendar, Outlook, Stripe, QuickBooks, Xero, and more. Enable add-ons like Forms, Online Booking, Customer Portal, AI Dispatcher, and others. See The Apps & Integrations Hub for a full walkthrough.
An owner or admin also pairs FieldCamp Voice here so voice agents can be used in FieldCamp. See connect FieldCamp Voice.
Path: Settings > Apps & Integrations
Pipeline Config
Define and manage status pipelines for both system objects and custom objects. Pipelines control the status workflow for records — for example, a Job might move through statuses like Scheduled, In Progress, and Completed, while an Invoice might go through Draft, Sent, and Paid. You can customize the status options and their order for each object type.
Supported system objects include: Jobs, Visits, Clients, Requests, Estimates, Invoices, Products & Services, and Timesheet. Any custom objects you create also get their own configurable pipeline. Each pipeline supports both table view and graph view for visualizing your records across statuses.
An object's pipeline page also carries the tabs that configure the rest of its behaviour:
- Transitions and Rules — which stage can follow which, and the conditions that gate a move.
- Automation — event-to-stage automation, on Requests, Jobs and Visits.
- Relationships and Fields — how the object links to others, and its field definitions.
- Line Items — on Products & Services only. Configures the dynamic line-item columns, sections, calculators and surcharges used by every document. See Configure line item columns.
- Settings — on Client, Job, Request, Estimate and Invoice. Hosts the Terminology editor for renaming a module's labels. See Rename modules with Terminology.
Path: Settings > Pipeline Config
Custom Objects
Create and manage custom objects to track data that doesn't fit into standard modules. Define custom fields, relationships, and views for your unique business needs. Custom objects appear in the sidebar under their own section.
Path: Settings > Custom Objects
Settings That Require Add-Ons
Some settings pages only appear when a specific add-on is enabled. Here is a quick reference:
| Setting | Required Add-On | Path |
|---|---|---|
| Forms | Forms | Settings > Forms |
| Job Cost Tracking | Job Logs | Settings > Job Cost Tracking |
| Job Templates | Multi-Day Job Templates | Settings > Job Templates |
| Online Booking | Online Booking | Settings > Online Booking |
| Service Area | Service Area | Settings > Service Area |
| Customer Portal | Customer Portal | Settings > Customer Portal |
| Outcomes | Calls | Settings > Outcomes |
| AI Dispatcher | AI Dispatcher | Settings > AI Dispatcher |
To enable an add-on, open it in Settings > Apps & Integrations, select Install, and complete any setup or activation shown on its card. Some add-ons require the Pro plan.
Job Type Presets, Skills, and Equipment are permission-gated settings, not AI Dispatcher add-on settings.
Who Can Access Settings
| Role | Settings Access |
|---|---|
| Account Owner | Full access to everything, including Plan & Billing |
| Admin | Broad settings access; Plan & Billing, AI Usage, and API Tokens stay account-owner only |
| Dispatcher | Jobs & Scheduling, Team Management, Saved Replies, Message Templates, and MCP Servers by default. The Platform section, AI Skills, Notifications Settings, Plan & Billing, AI Usage, and API Tokens are never available. Other pages — System Settings, Company Details, Business Schedule, Tax, Contracts, Terms & Conditions, Document Templates, and Workflow Automation — appear only if an admin grants that System Settings permission |
| Field Technician Pro | Settings > General for their own profile, MCP Servers, and, if the workspace has QuickBooks connected, a QuickBooks row they cannot open; add-on and Platform pages are hidden |
| Field Technician Lite | Settings > General for their own profile, MCP Servers, and, if the workspace has QuickBooks connected, a QuickBooks row they cannot open; add-on and Platform pages are hidden |
Plan & Billing, AI Usage, and API Tokens are all shown to the account owner only. Invited team members do not see them.
The QuickBooks row has no role gate. It is hidden only when QuickBooks is not connected, and the connection is workspace-wide — so every user in a QuickBooks workspace sees the row, even the ones whose role cannot open the page.
Can't find a setting? Check the Troubleshooting article for common issues with missing settings and pages.
Quick Settings Reference
| Setting | Section | Path | Add-On Required? |
|---|---|---|---|
| General (Profile) | General | Settings > General | No |
| System Settings | General | Settings > System Settings | No |
| Notifications Settings | General | Settings > Notifications Settings | No (Owner, Admin, or Super Admin) |
| Plan & Billing | General | Settings > Plan & Billing | No (Owner only) |
| AI Usage | General | Settings > AI Usage | No (Owner only) |
| Company Details | Company | Settings > Company Details | No |
| Business Schedule | Company | Settings > Business Schedule | No |
| Team Management | Company | Settings > Team Management | No |
| API Tokens | Company | Settings > API Tokens | No (Owner only) |
| Job Type Presets | Jobs & Scheduling | Settings > Job Type Presets | No (Admin or Dispatcher access) |
| Skills | Jobs & Scheduling | Settings > Skills | No (Admin or Dispatcher access) |
| Equipment | Jobs & Scheduling | Settings > Equipment | No (Admin or Dispatcher access) |
| Job Templates | Jobs & Scheduling | Settings > Job Templates | Multi-Day Job Templates |
| Forms | Forms & Reports | Settings > Forms | Forms |
| Job Cost Tracking | Forms & Reports | Settings > Job Cost Tracking | Job Logs |
| Document Templates | Forms & Reports | Settings > Document Templates | No |
| Contracts | Documents & Billing | Settings > Contracts | No |
| Terms & Conditions | Documents & Billing | Settings > Terms & Conditions | No |
| Tax | Documents & Billing | Settings > Tax | No |
| QuickBooks | Documents & Billing | Settings > QuickBooks | No (appears once QuickBooks is connected) |
| Workflow Automation | Automation | Settings > Workflow Automation | No |
| AI Dispatcher | Automation | Settings > AI Dispatcher | AI Dispatcher |
| AI Skills | Automation | Settings > AI Skills | No |
| MCP Servers | Automation | Settings > MCP Servers | No (open to every user) |
| Online Booking | Customer Experience | Settings > Online Booking | Online Booking |
| Service Area | Customer Experience | Settings > Service Area | Service Area |
| Customer Portal | Customer Experience | Settings > Customer Portal | Customer Portal |
| Outcomes | Customer Experience | Settings > Outcomes | Calls |
| Saved Replies | Customer Experience | Settings > Saved Replies | No (Dispatcher access or above) |
| Message Templates | Customer Experience | Settings > Message Templates | No (Dispatcher access or above) |
| Apps & Integrations | Platform | Settings > Apps & Integrations | No |
| Pipeline Config | Platform | Settings > Pipeline Config | No |
| Custom Objects | Platform | Settings > Custom Objects | No |
Related articles
FAQ's
Why can't I see certain settings in my menu?
The setting may be blocked by your role, plan, or an add-on requirement, or hidden in your customized Settings sidebar. Field Technician Pro and Lite roles see Settings > General for their own profile, MCP Servers, and, if the workspace has QuickBooks connected, a QuickBooks row they cannot open; add-on and Platform pages are hidden. Dispatchers get Jobs & Scheduling, Team Management, Saved Replies, Message Templates, and MCP Servers by default, never the Platform section, AI Skills, Notifications Settings, Plan & Billing, AI Usage, or API Tokens, and see the rest only if an admin grants that System Settings permission. For add-on-dependent settings such as Forms, which needs the Forms add-on, Online Booking, or AI Dispatcher, open Settings > Apps & Integrations and confirm the add-on is connected.
Can I reset all settings to default?
FieldCamp does not have one global reset for every setting. Individual pages can provide their own reset action; for example, Notifications Settings has Reset to defaults. Change or reset each settings area separately.
Where do I change my company logo and address?
Go to Settings > Company Details. You can upload your logo, update your business name, address, phone number, and website. These details appear on invoices, estimates, and customer-facing documents. See the Quick Start guide for a full walkthrough.
What's the difference between System Settings and Company Details?
System Settings controls document numbering, Smart Scheduling defaults, conflict detection, estimate margin display, site measurements, service duration, and Calendar display and colors. Company Details stores the business identity and regional settings, including time zone and currency.
Adding & Managing Team Members in FieldCamp
Invite team members to FieldCamp, assign roles, set skills and labor rates, and manage permissions. Step-by-step guide for admins and dispatchers.
FieldCamp Add-ons: Current Catalog and Setup
Browse FieldCamp add-ons, understand current plan gates, install Smart Kits and Inbox channels, and complete AI Dispatcher activation.