 FieldCamp
Transfer a call to a person (warm or cold) | FieldCamp
Set up warm and cold call transfers so your voice agent can hand callers to a person, pass context to your team, and handle transfers that fail.
Some calls need a person. A caller reports a gas smell, a commercial kitchen's grease trap is backing up during service, or a customer simply asks for someone on your team. A Transfer call tool lets your voice agent put the caller through to a phone number or a desk extension while the call is still live.
You build the transfer tool once on the Tools page in FieldCamp Voice, then attach it to the steps that may need it. Only the tools a step has selected are available to that step. For how tools fit together, see Add tools to your AI voice agent.
Warm vs cold transfer
The Handoff setting on the tool decides how the caller is handed over.
| Standard transfer (cold) | Warm transfer (Twilio) | |
|---|---|---|
| What happens | The call goes straight to the destination. | The caller is held while Voice checks that a person answered. That person privately hears a whisper and presses 1 to accept. Then both parties hear an introduction. |
| What your team hears first | The caller. | Your Private destination whisper, for example "After-hours emergency from the AI receptionist." |
| Phone providers | Phone numbers on Twilio or Plivo, and SIP endpoints on Asterisk (ARI). | Twilio only. |
| Best for | A desk that always expects callers, such as your office line during business hours. | An on-call technician's mobile, where you want the person to know what the call is about before they speak. |
Warm transfer works only with Twilio. If your agent answers calls on another provider, use Standard transfer.
Create a transfer tool
Open Tools
In Voice, click Tools in the sidebar, then click New tool.
Choose Transfer call
Under What should it do?, choose Transfer call. Voice fills in a starting Name and Description, which you can change.
Create the tool
Click Create tool. The tool's page opens with its full settings.
Fill in the transfer settings
Set the handoff, destination and messages described below, then click Save changes.
The tool's page has these settings:
- Handoff: Standard transfer or Warm transfer (Twilio).
- Destination caller ID: the number your team sees when the transfer rings. Choose Provider default (existing behavior), Agent's number or Caller's number. An explicit caller ID needs provider support, and carriers may reject an unverified number. If that happens, the transfer follows its failure path.
- Name: "Only you and your team see this." Name it after the person or desk, for example "Transfer to on-call plumber".
- Description: "Say when the agent should transfer. It decides from what you write here." Be specific, for example "Transfer when the caller reports an emergency under our emergency rules, or asks for a person twice."
- Pre-transfer message: No message (transfer straight away), Custom message (a line of your own, such as "Please hold while I transfer your call.") or Pre-recorded audio (a clip from Audio clips).
- Transfer timeout: how long to wait for the other end to pick up, in seconds. Between 5 and 120; 30 by default.
- Destination: where the call goes. See Choose the destination.
Set up a warm transfer
When you choose Warm transfer (Twilio), four more fields appear.
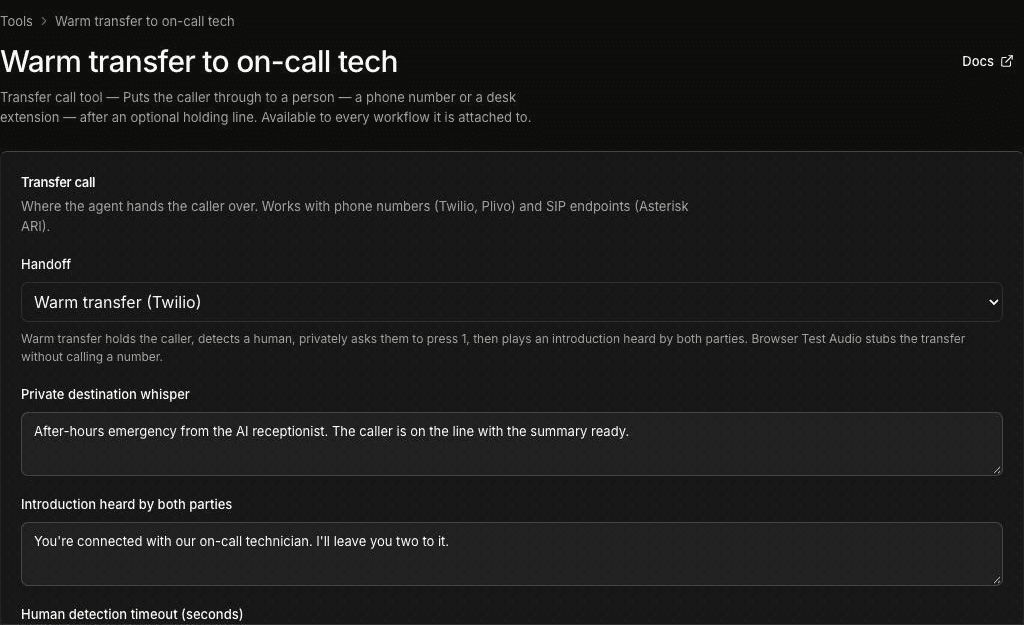
- Private destination whisper: what your team member hears before the caller joins. The caller doesn't hear it. The default is "A caller is waiting to speak with you." Keep it short and say why the call matters, for example "No-heat call from a returning customer. Press 1 to take it."
- Introduction heard by both parties: played once your team member accepts, for example "You're connected with our on-call technician. I'll leave you two to it."
- Human detection timeout (seconds): how long Voice listens for a person to answer. The default is 15, from 3 to 30.
- Press-1 acceptance timeout (seconds): how long your team member has to press 1. The default is 10, from 5 to 30.
Test Audio in the browser doesn't place real transfers. It stubs the transfer without calling a number. To hear a real transfer, call the agent on a phone number, for example with Call my phone… in the builder's ⋯ menu.
Choose the destination
Under Destination, pick one of these:
- Static / template: you set the destination on the tool. In Transfer destination, enter a fixed phone number (such as +1234567890), a SIP endpoint (such as PJSIP/1234), or a template that reads a value from the call, such as
{{initial_context.transfer_destination}}. - Dynamic HTTP resolver: Voice looks up the destination when the call happens. Enter a Resolver URL. FieldCamp sends the collected values to that address, and your endpoint must return
transfer_context.destination. It may also returntransfer_context.custom_message, which replaces your pre-transfer message. You can also set a Resolver timeout (500–5000 ms, 3000 by default), an optional Resolver credential, a Resolver wait message spoken while Voice waits, and Parameters, Preset parameters and Custom headers.
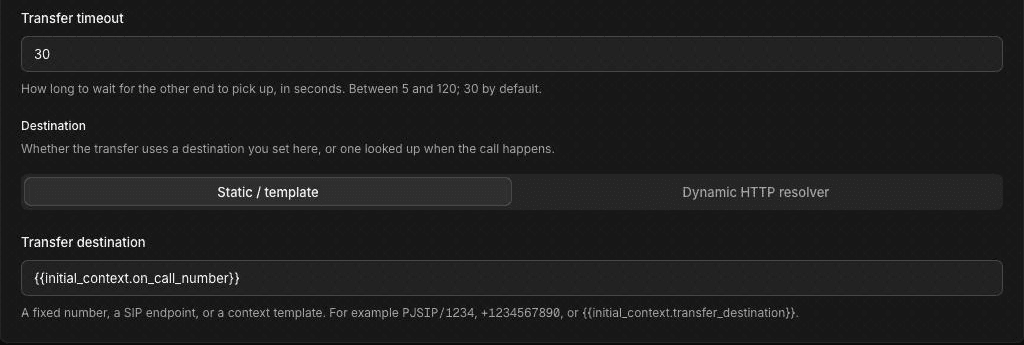
A template destination is useful when the number changes. For example, an HVAC company can pass the on-call technician's number into the call as {{initial_context.on_call_number}}. If a template variable has no value, it becomes empty, so the transfer has nowhere to go. Test it before you rely on it. See Use dynamic variables in voice agents.
A third option, Context mapping, appears only when External PBX integrations are enabled in Platform Settings. It maps a value the agent gathered, such as a service type, to a destination.
Handle a failed transfer
A transfer can fail. The carrier may reject the caller ID, or the transfer may not go through. Plan where the call goes next instead of leaving the caller in silence.
Attach the tool to a step
Open the step that should transfer, such as an Agent step named "Is it urgent?". In Tools, on the HTTP & Tools tab, select your transfer tool and save the step.
Add a connection for the failure
Drag a connection from that step to the step that should take over, for example an Agent step that takes a callback number and promises a call back under your own rules.
Set the path trigger to Transfer failed
Double-click the connection label to open Edit Condition. Set Path trigger to Transfer failed, then under Transfer tool on this step, pick the transfer tool.
Each step can have one Transfer failed connection per transfer tool, and the tool must be attached to that step. For more on connections, see Set up transitions and conditions.
If you've connected FieldCamp and your calls reach the agent through a FieldCamp call flow, the flow can also send the caller to your team once the agent's part of the call ends. That is set up in FieldCamp, not in the transfer tool. See How AI voice agents work with FieldCamp and, for your FieldCamp phone numbers, Calls setup and usage in the FieldCamp docs.
When to transfer
Write your transfer rules into the tool's Description and the step prompt. Your company decides what counts as urgent. These are examples to replace with your own rules:
- HVAC: no heat with a vulnerable person in the home, or a carbon monoxide alarm.
- Plumbing: an active leak the caller can't shut off.
- Electrical: burning smells, sparking or a panel that is hot to the touch.
- Grease trap and used cooking oil routes: a restaurant with a backed-up trap during service.
- Any trade: the caller asks for a person again after the agent has tried to help.
Tell the agent what to do before it transfers, such as confirming the service address and callback number. If the transfer fails, the agent already has what your team needs to call back.
You can also let callers press a key, such as 0, to reach a person by branching on keypad input. See Capture keypad input and handle call screening.
Frequently asked questions
What is a warm transfer?
A warm transfer holds the caller while Voice checks that a person answered, privately tells that person about the call, and waits for them to press 1. Then both parties hear an introduction. In Voice, warm transfer works only with Twilio.
What is a cold transfer?
A cold transfer sends the caller straight to the destination without briefing the person who answers. In Voice, this is the Standard transfer handoff, and it works with Twilio, Plivo and Asterisk (ARI) SIP endpoints.
How do I transfer a call?
Create a Transfer call tool on the Tools page, set its destination, and attach it to the steps that may need it. The agent decides when to transfer from what you write in the tool's Description.
What happens if nobody answers?
The tool waits for the other end to pick up for the Transfer timeout, which is 30 seconds by default. Add a Transfer failed connection from the step so the call moves to a step you chose, such as one that takes a callback number, if the transfer doesn't go through.
What does my team hear before the caller joins?
With a warm transfer, your team member hears the Private destination whisper and is asked to press 1. The caller doesn't hear the whisper. With a standard transfer, your team member is connected to the caller straight away.
Related articles
Book and dispatch jobs during a call | FieldCamp
Let your voice agent create a job during the call, then have AI Dispatcher suggest the technician and time window the agent can accept or reject.
Let your voice agent end the call | FieldCamp
Add the End call tool so your voice agent can hang up at the right moment, such as after it confirms a booking or when a caller says goodbye.