 FieldCamp
Online Booking Appearance & Branding Settings in FieldCamp
Customize your booking page colors, logo, favicon, and hero image to match your brand identity. Make your FieldCamp online booking page look professional.
Make your online booking page match your brand. The Appearance tab lets you customize colors, upload your logo, and add a hero image — so customers see your business, not a generic form.
To get started, go to Settings → Online Booking → Appearance.
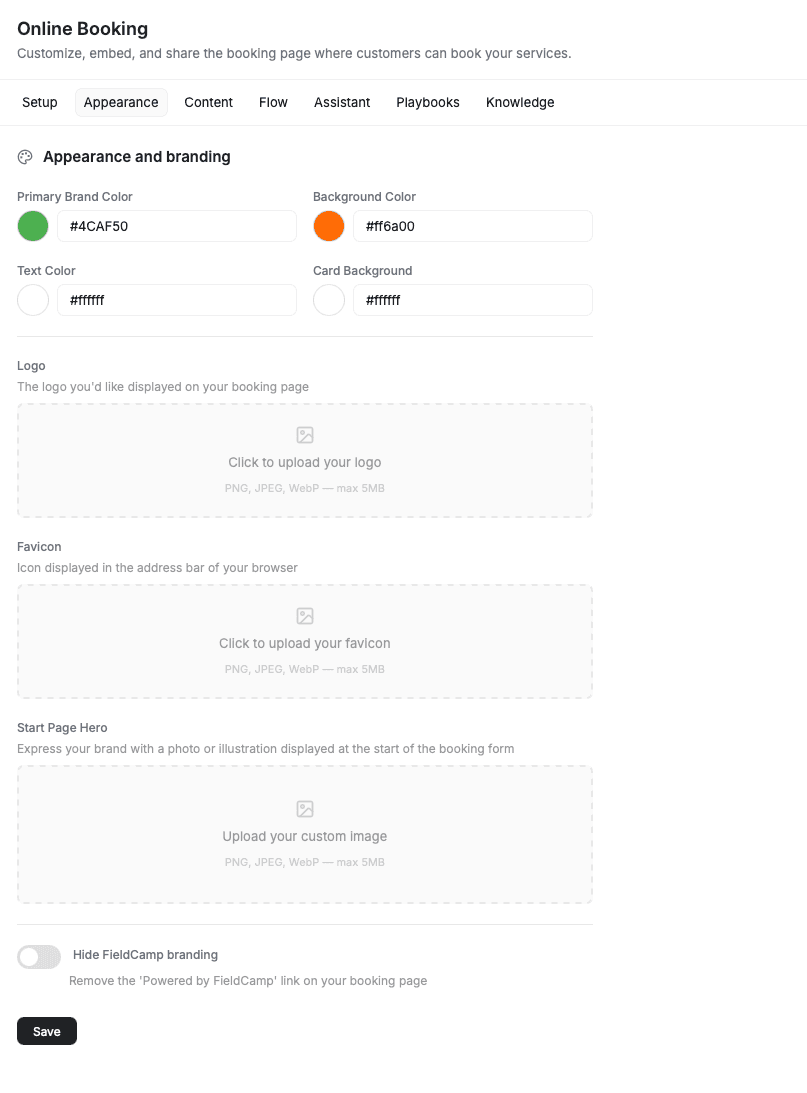
Brand Colors
Set four colors to match your brand identity. Changes preview instantly on the right side of the screen.
- Primary Brand Color — used for buttons, links, and accents. Enter a hex code like
#4CAF50or click the color circle to open the picker. - Background Color — the main background of your booking page.
- Text Color — headings and body text color.
- Card Background — the background color for cards and containers on the booking page.
Choose colors with enough contrast between text and background. Dark text on a light background works best for readability.
Logo & Favicon
Upload your business logo and favicon so your booking page looks professional and recognizable.
- Logo — displayed at the top of your booking page. Upload a PNG, JPEG, or WebP file (max 5MB). A horizontal logo works best.
- Favicon — the small icon shown in the browser tab when customers visit your booking page. Upload a square image (PNG, JPEG, or WebP, max 5MB).
Click the upload area and select your file, or drag and drop.
Start Page Hero & Branding
Add a photo or illustration to the top of your booking landing page. This is the first thing customers see when they visit your booking page.
- Start Page Hero — click "Upload your custom image" to add a hero banner. PNG, JPEG, and WebP formats supported (max 5MB). A wide, landscape-oriented image works best.
- Hide FieldCamp branding — toggle this on to remove the "Powered by FieldCamp" link from the bottom of your booking page. Gives customers a fully white-labeled experience.
Live Preview
Every change updates the preview panel on the right in real-time. Use the "View" dropdown at the top of the preview to switch between different booking steps and see how your colors and branding look on each screen.
When you're happy with your changes, click Save at the bottom of the settings panel.
Related Articles
- Setting Up Online Booking in FieldCamp — choose your booking type and deploy options
- Content & Text Customization — customize headings, labels, and button text on each booking step
- Booking Steps Configuration — enable, disable, and reorder steps in the booking flow
- Adding the Booking Widget to Your Website — embed the booking form on your site
Setting Up Online Booking in FieldCamp — Complete Guide
Set up online booking in FieldCamp: choose booking types, deploy a widget, configure steps, and turn on the AI booking assistant.
Online Booking Content & Text Customization | FieldCamp
Customize headings, subtitles, and button labels on every step of your FieldCamp online booking widget to match your brand voice and improve conversions.