 FieldCamp
Build your franchise branch structure
Add locations, divisions, regions and areas to your franchise branch tree, give a branch its own workspace, and rename, move, delete or restore branches.
The Structure tab in Franchise HQ holds your branch tree: every location that runs its own books, and the regions and areas you use to group them. This guide shows you how to add branches, give a branch its own workspace and keep the tree tidy as your network changes.
Before you begin
- You need the Add, move, rename and restore branches capability. The built-in Owner and Admin roles have it. Without it, the tab shows "Read-only — your role can't change the structure." See franchise roles and permissions.
- To add a branch at the top level, or move one there, you also need Whole franchise access.
- You only see the branches your access reaches.
Branch types
Pick a type when you add a branch. You can't change the type later.
| Type | What it is |
|---|---|
| Location (has its own books) | A real branch with its own clients, jobs and invoices. It gets a workspace. |
| Division (has its own books) | Also a real branch with its own workspace and records. |
| Region (groups branches) | A folder for grouping branches. It holds no data. |
| Area (groups branches) | A folder for grouping branches. It holds no data. |
Each row in the tree shows the branch name, its type and a badge:
- Has workspace: the location or division has its own workspace.
- No workspace: the location or division hasn't been given a workspace yet.
- Grouping only: a region or area.
- Deleted: shown only when Show deleted is on.
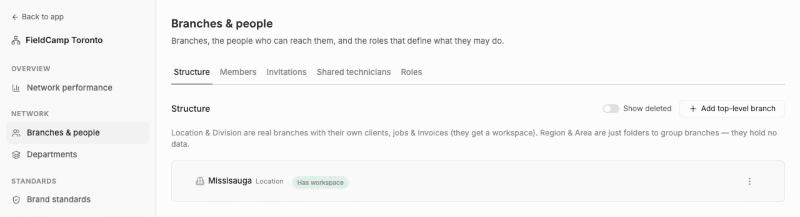
Add a branch
Open the Structure tab
In Franchise HQ, go to Branches & people and select the Structure tab.
Choose where the branch goes
- To add it at the top of the tree, click Add top-level branch.
- To add it inside a region or area, click Add branch on that row.
- To add it under another branch, open the row's menu and choose Add child branch.
Name the branch
Enter a Name, for example "Downtown". Two branches at the same level can't share a name.
Pick the type
Choose a Type. It defaults to Location (has its own books). The note under the field tells you whether the branch will be added at the top level or under the branch you selected.
Create it
Click Create. The branch appears in the tree.
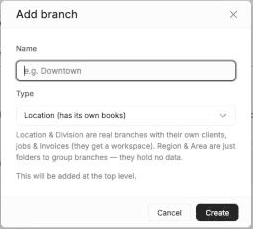
A location or division that already has a workspace can't have branches under it. Use a region or area to group branches instead.
Give a location or division its workspace
A new location or division starts with No workspace. It needs a workspace before anyone can book work in it. Regions and areas never get one.
Start the workspace setup
On the branch row, click Add workspace. A two-step dialog opens.
Enter the basics
Check the Company name, which starts as the branch name, and choose a Language: English, Spanish, French, Thai or Arabic. Click Next.
Enter the company details
Type the branch Address and pick it from the suggestions. It's required because it prints on the branch's invoices and estimates. Currency and Timezone are pre-filled from HQ when HQ has them set; change them if this branch is different.
Create the workspace
Click Create workspace. FieldCamp confirms with Workspace created, and the row shows Has workspace.
You can change these details later in the branch's own company settings. To open the new workspace, use the switcher described in switch between branch workspaces.
Rename a branch
Open the row's menu, choose Rename, enter the new Name and click Save. Renaming changes only the display name; the branch stays where it is in the tree.
Move a branch
Open Move
Open the row's menu and choose Move.
Pick the new parent
In New parent, choose another branch or Top level (no parent). Only branches without a workspace are offered, and you can't move a branch under itself.
Preview the move
Click Preview move. FieldCamp shows the old and new position and how many branches below it will move too.
Confirm
Click Move. FieldCamp confirms with Branch moved.
Network totals for the old and new parent change once the move is applied. FieldCamp refuses the move if a branch with the same name already sits at the destination.
Delete and restore a branch
Deleting removes a branch from the tree without erasing it, so you can restore it later.
Clear its children first
A branch with live branches under it can't be deleted. Move or delete those branches first.
Delete the branch
Open the row's menu, choose Delete and confirm. FieldCamp confirms with Branch deleted.
A deleted branch no longer appears in the tree or in the workspace switcher. Its workspace and records aren't erased.
To restore a branch, turn on Show deleted. Deleted branches appear struck through with a Deleted badge. Open the row's menu and choose Restore, then confirm. The branch and any deleted branches under it become visible and usable again. If its parent is also deleted, restore the parent first.
Related articles
Switch between branch workspaces in FieldCamp
Use the FieldCamp workspace switcher to move between your HQ and branch workspaces, open the franchise console, and filter a branch's work by department.
Invite and manage franchise members
Invite people to Franchise HQ with a role and branch access, manage invitation links, and suspend, reinstate, revoke or change a franchise member's access.